Since I’m switching from Canon to Sony, I thought MagicLantern deserved a departing video, since it’s an amazing tool for anyone shooting with Canon cameras, and super useful for anamorphic users.
USEFUL LINKS:
- Get a Canon 5D3 on eBay
- Get fast Compact Flash cards on eBay
- Get a Sony A7s2 on eBay
- RAW vs H.264 comparisons
- Tutorial on how to shoot RAW using MagicLantern
- Download my anamorphic cropmarks for MagicLantern
- Check out MagicLantern’s website
- Watch Zona SSP’s Pilot Episode I shot with ML RAW and anamorphic glass
All the RED links on this post are part of eBay’s Partner Network, so if you purchase anything through them, you’re helping me to keep this project going.
You can support this project on Patreon. Make your contribution and help the Anamorphic Cookbook!
Magic Lantern became extremely popular in 2013 for enabling RAW video recording on many Canon DSLRs, and RAW absurdly improves image quality over the original H.264 codec, you can see some comparisons here and here. I can honestly say it was Magic Lantern and RAW recording that made me hold on to my 5D3 for so long. The only issue is that you need tons of fast cards. I tested the workflow on several personal projects – including Zona SSP – and have used it for all the reviews in this channel until after the Isco Widescreen 2000 review, when I switched to the Sony A7s2.
Zona SSP
The common ground between shooting RAW and using anamorphic lenses is the ability to pick a non-standard “recording window” from the camera’s sensor area. If I set a recording window to 4:3 and use 2x stretch lenses, the final output is 2.66:1 instead of 3.56:1. Shooting with a shorter aspect ratio also avoids wasting footage that would be immediately cropped in post. While shooting RAW, these guidelines show you what’s being recorded, so they’re your key to framing.
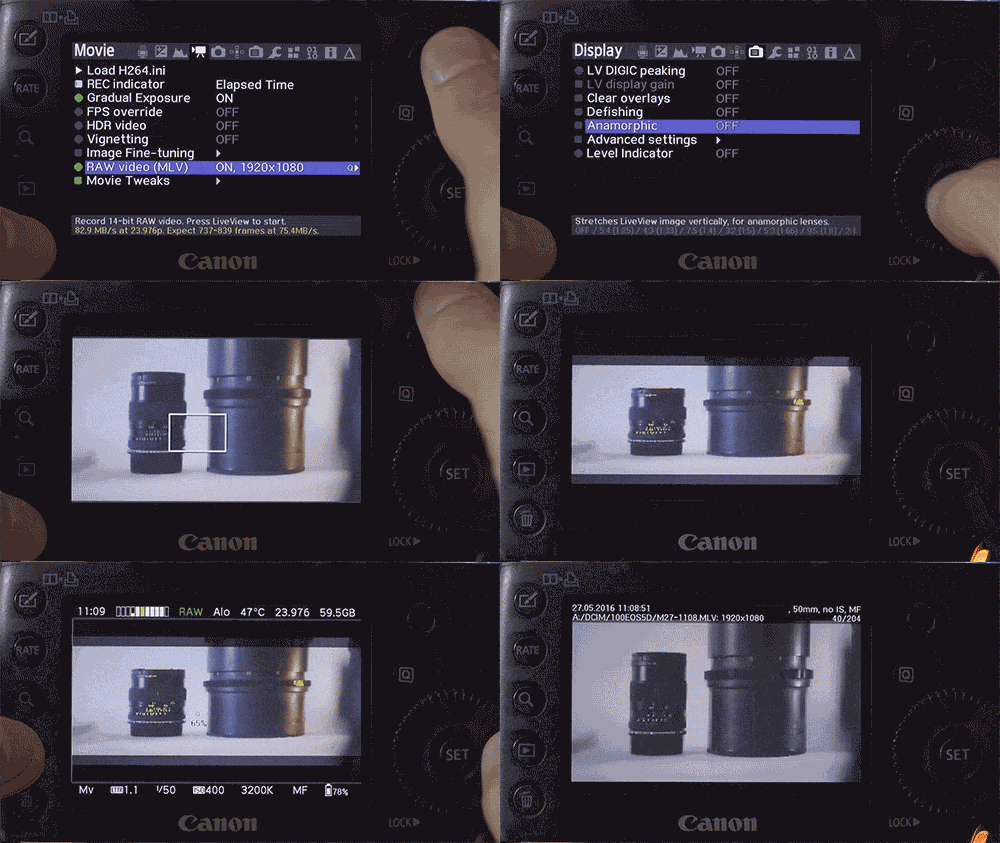
To change the recording resolutions, go in the “Movie” tab, then “RAW video (MLV)”, enter its submenu (Q) and open the “Aspect Ratio” tab. There you can change it freely. I’ll go with 4:3. Then you can go in “Resolution” and adjust the size according to your preference. For 4:3 I usually go with 1600×1200, then so you know what you’re framing, set “Global Draw” to Allow (the default is OFF). If you want more information on how to shoot RAW, there’s plenty of tutorials around.

CUSTOM CROP MARKS
My first contribution to Magic Lantern was way before RAW video, and it’s still useful for cameras that can’t handle RAW: custom anamorphic crop marks. These are overlays placed on top of the image that is being shot, allowing you to preview a different frame format than the one that is actually being shot. This guides my framing based on the final aspect ratio I want for the video. The Anamorphic Calculator is a great tool to help you with that too.
Since mixing stretch factors in the same video is a common thing (more than once I used a 1.33x stretch lens for some shots and a 1.5x or 2x stretch for others) we know that something is gonna be cropped off later (either top-bottom or left-right of the frame). From here, I created nine unique crop marks that allow mixing any kind of lenses (from spherical to 2x) always showing what’s the core framing and what will be cropped. To install them, just copy the BMP files to the ML/CROPMKS folder in your card. You’ll have to remove any other cropmarks, as the limit is nine.
To enable them, go on the “Overlay” tab, then into “Cropmarks” (Q) and choose the one you want. I also like to enable “Show in PLAY mode”, so when I’m reviewing the footage I can see what’s going to be cropped.

File names look like some sort of code but I promise they make sense: the first value is the final aspect ratio, according to the lens stretch. 1.33x stretch results in 2.4:1, 1.5x equals 2.66:1 and the monstrous 2x goes as wide as 3.56:1. The second part of the file name is for the kind of lens being used. Let’s say my whole project was shot with 2x stretch and I’m going for the 3.56:1 aspect ratio. After principal photography is done, I have to shoot some extra footage using spherical lenses. In this case, I need to pick the “2x-norm” crop mark for the extra footage.
ON SET PREVIEW
One of my main concerns shooting anamorphic was how to take a look at the footage on set at the correct aspect ratio, not squeezed like it’s shot. This is really easy to solve through Magic Lantern. In the “Display” tab, there’s an “Anamorphic” submenu. This submenu offers the most common lens stretches. By selecting one of the values, this stretch is applied to the LiveView and you see things in the right proportion while shooting. Its only flaw is the fact that it doesn’t work when you’re reviewing your clips in Play Mode. Developers informed me that messing around with Play Mode is complex and risky, but it works great with RAW recording!

If you’re handling the camera by yourself this is a great solution for it eliminates the need for any other piece of gear devoted only to fixing the images’ aspect ratio.
I thought Magic Lantern deserved this video since it was my loyal companion, making my life easier and the results better, through these years of shooting indie anamorphic projects. I miss the custom crop marks and LiveView stretch every time I’m shooting bare bones with the A7s2 and I’m still getting used to life without it. If you’re shooting with Canon and haven’t tried Magic Lantern yet, waste no more time. Just before you do that, remember to subscribe and quickly check the blog for more reviews, downloads and tutorials! Ferradans out.
