Anamorphic

Anamorphic on a Budget - Isco Anamorphot 8/1.5x

June 19, 2016

First baby anamorphic review, the Iscomorphot 8/1.5x is part of the Isco family but shares very little with its bigger brothers and sisters. More suited to smaller sensor cameras, it was a challenge on the A7s II.

USEFUL LINKS:

All the RED links on this post are part of eBay's Partner Network, so if you purchase anything through them, you're helping me to keep this project going.

You can support this project on Patreon. Make your contribution and help the Anamorphic Cookbook!
Anamorphic

Anamorphic Chop Shop - Cheap 72mm +0.5 Diopters

June 12, 2016

To make up for last week's extreme tutorial, here's a super simple one that's sure to help most beginners and people hunting for big low powered diopters!

USEFUL LINKS:

All the RED links on this post are part of eBay's Partner Network, so if you purchase anything through them, you're helping me to keep this project going.

You can support this project on Patreon. Make your contribution and help the Anamorphic Cookbook!
Anamorphic

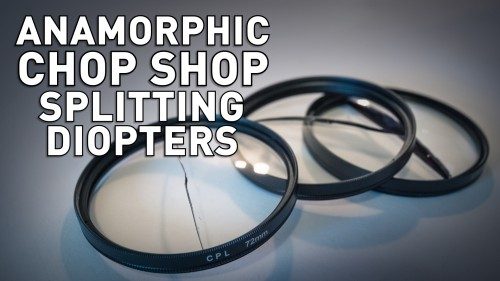
Anamorphic Chop Shop - Splitting Diopters

June 5, 2016

Since I watched "The Hateful Eight" and noticed a split field shot, meaning, a close up filter that only covers half of the lens, I wanted to get myself a set of these. With no help from eBay, I ended up making my own, and here's how you can do yours!

USEFUL LINKS:

All the RED links on this post are part of eBay's Partner Network, so if you purchase anything through them, you're helping me to keep this project going.

You can support this project on Patreon. Make your contribution and help the Anamorphic Cookbook!
Tito Ferradans here for an extremely hardcore tutorial on how to make your own split field diopters. In case you don't know what split fields are, they are diopters that cover only half the lens. By doing so you can have things in focus on the foreground and background at the same time. I started to obsess about these after watching "The Hateful Eight", which features a split field shot, and started to hunt them on eBay with no luck. All I could find were small sized ones and I needed at least 72mm to fit my anamorphics. It takes some practice to get used to the technique, so the sooner you get yours done, the sooner you can start practicing.

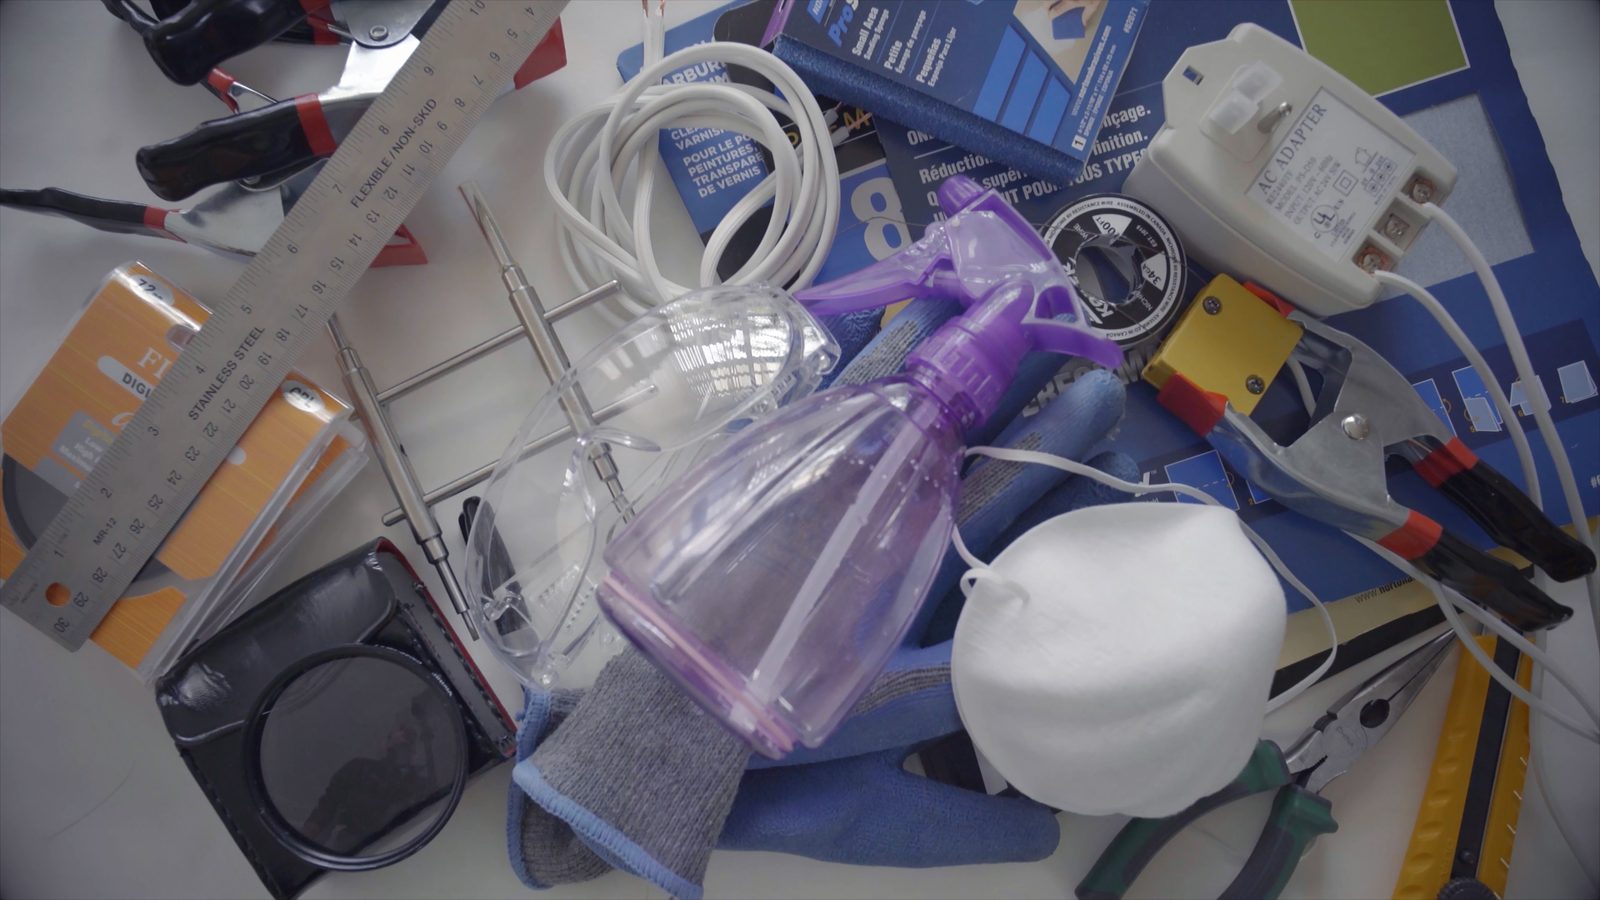
What are we gonna need here? Diopters (mine are 72mm, but you can get whichever size you like), a few circular polarizers, a black sharpie marker, many clamps, LOTS of sandpaper (or sanding stones), wire, a transformer (mine is 24V, 50W), nichrome wire (thicker than gauge 34, for your own good), a ceramic connector, lens wrench, gloves, mask, protection goggles, pliers, exacto knife, a ruler a bucket of water and a water sprayer.

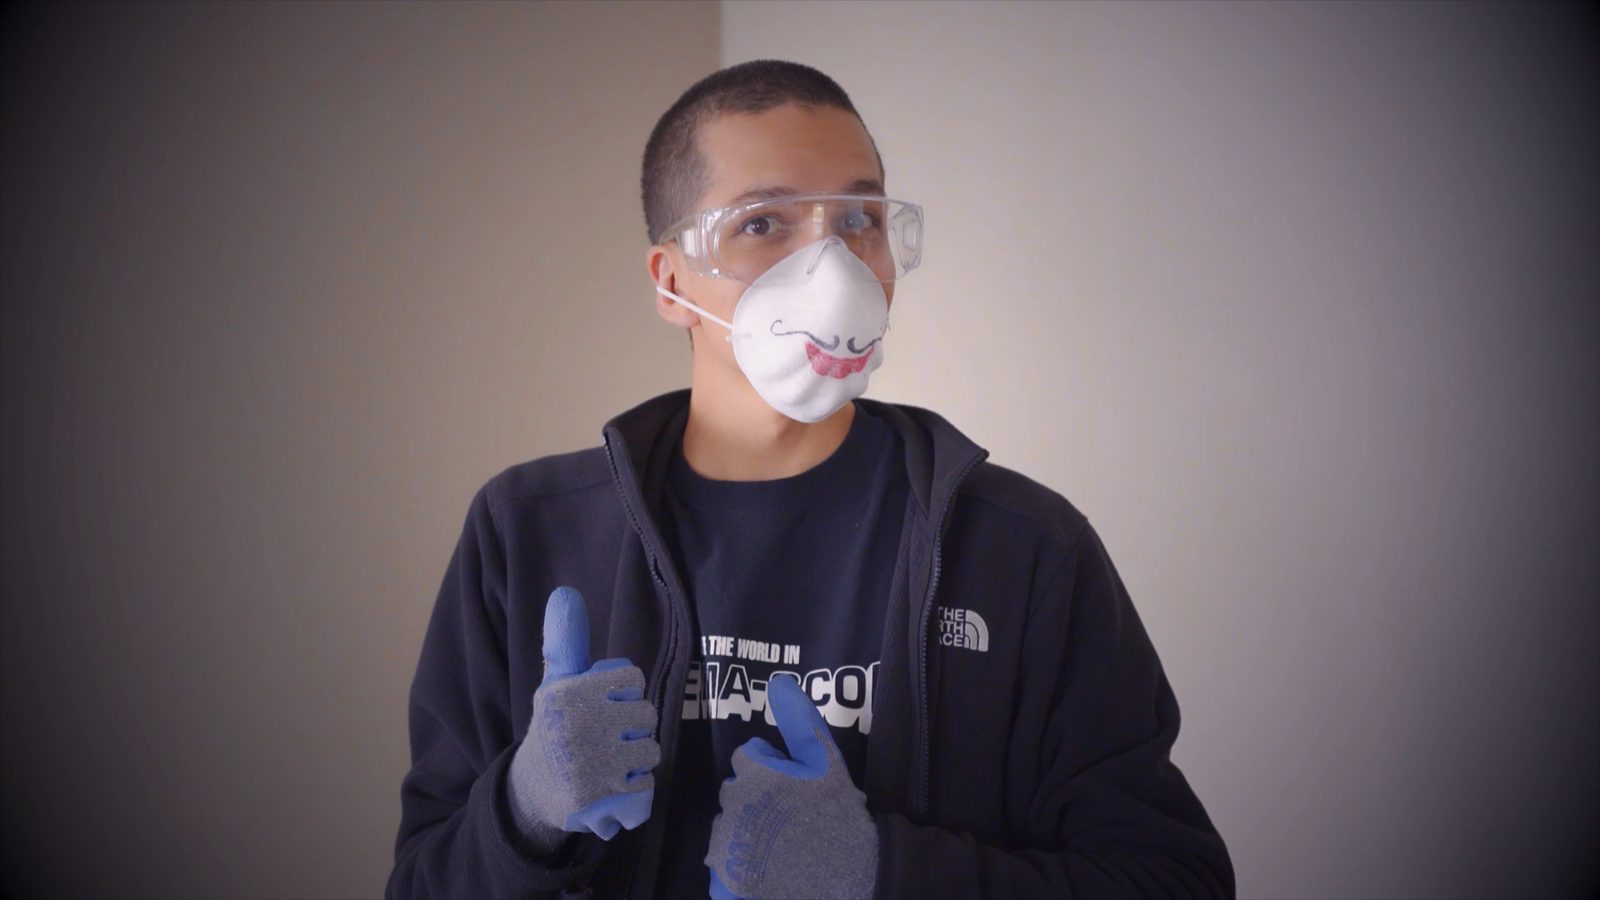
Electricity is a key part in this tutorial, so play SUPER SAFE. I had a ton of help from my friend Bruno Nicko, who's starting his own channel with a series of DIY videos (his first project is revamping a dead electric scooter). Many things can go wrong with electricity, so I asked Bruno to explain the details regarding resistance, current, voltage and everything else so you have a rough idea if you're gonna burn your house down. Always wear protective gear and be extra careful with all the steps in this tutorial.

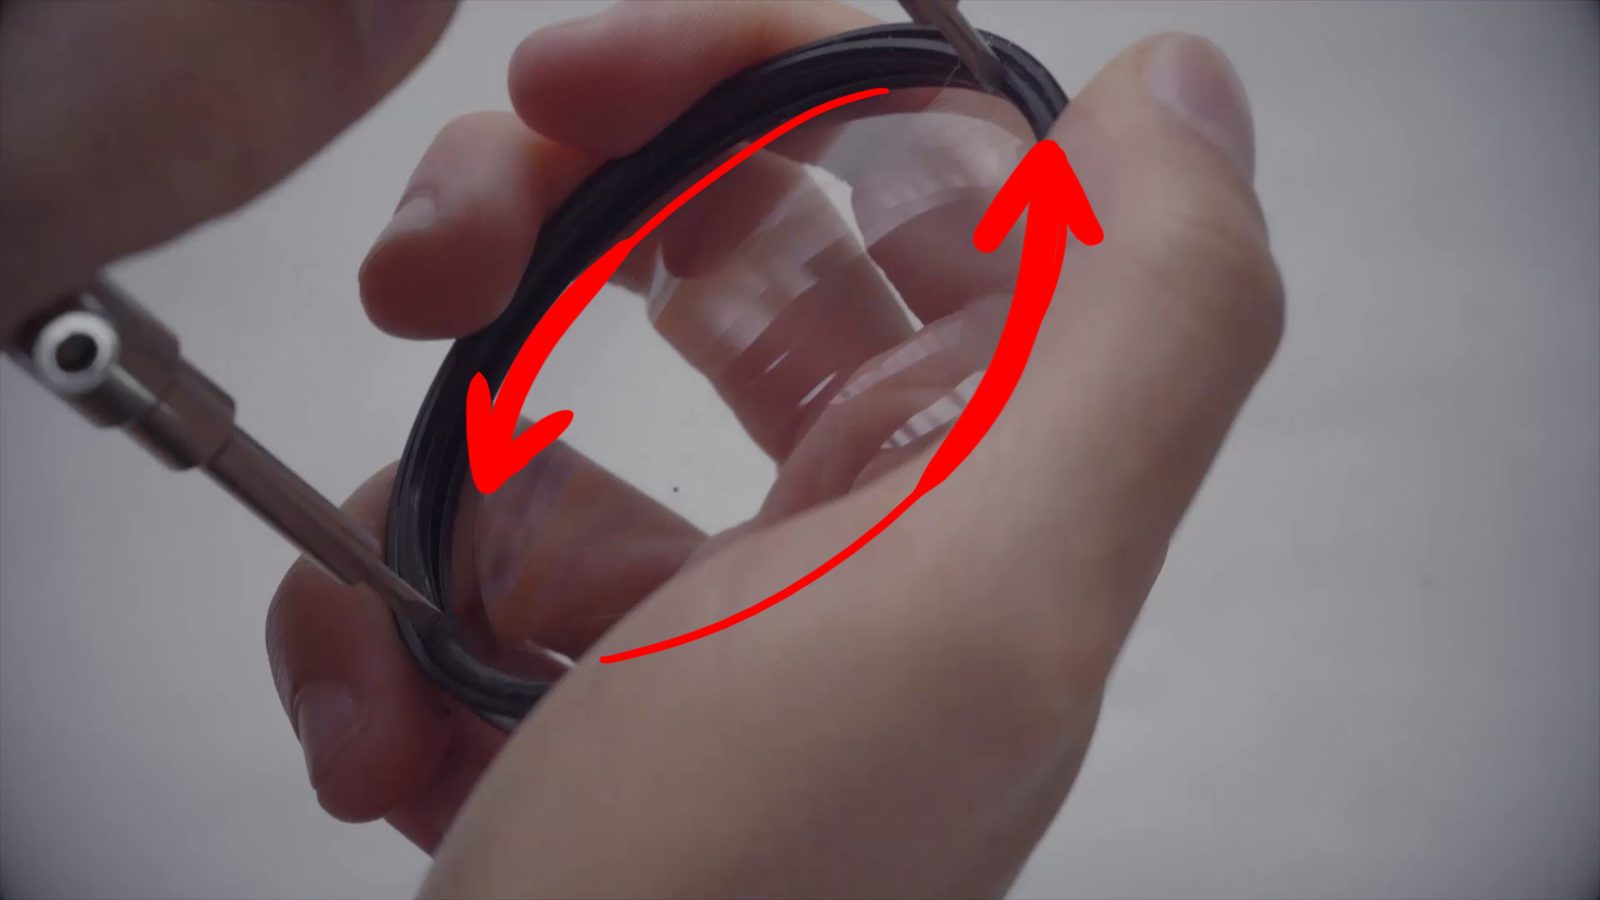
Let's get started with an easy step: remove the diopter from its original filter frame. These rings are super cheap and you won't be using them anymore, so don't worry if the locking ring breaks in the process.

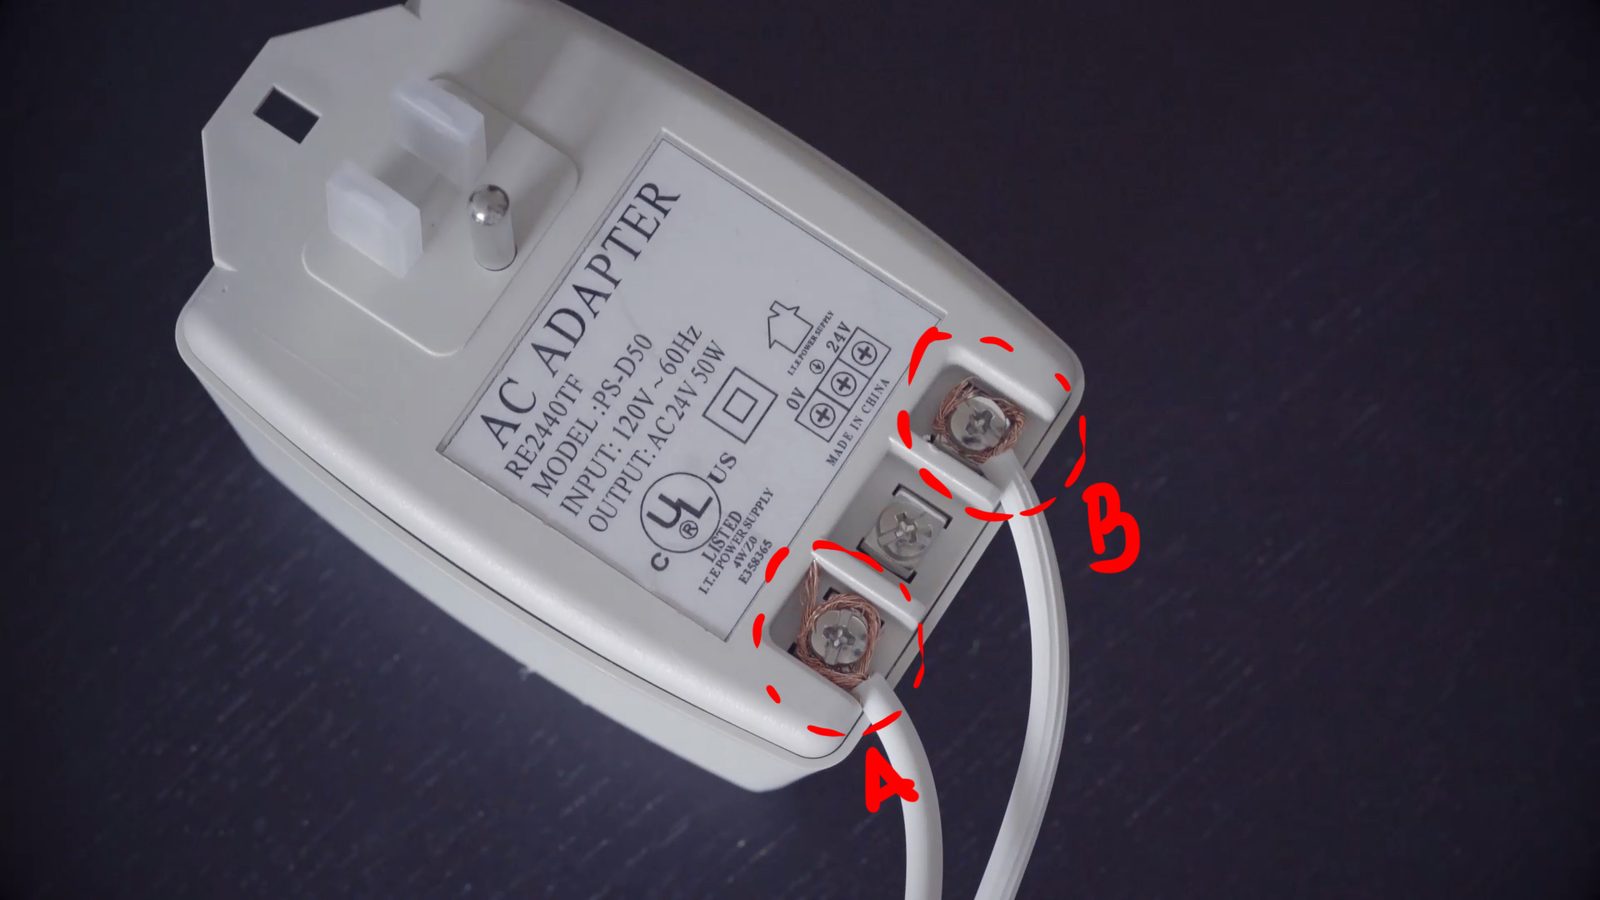
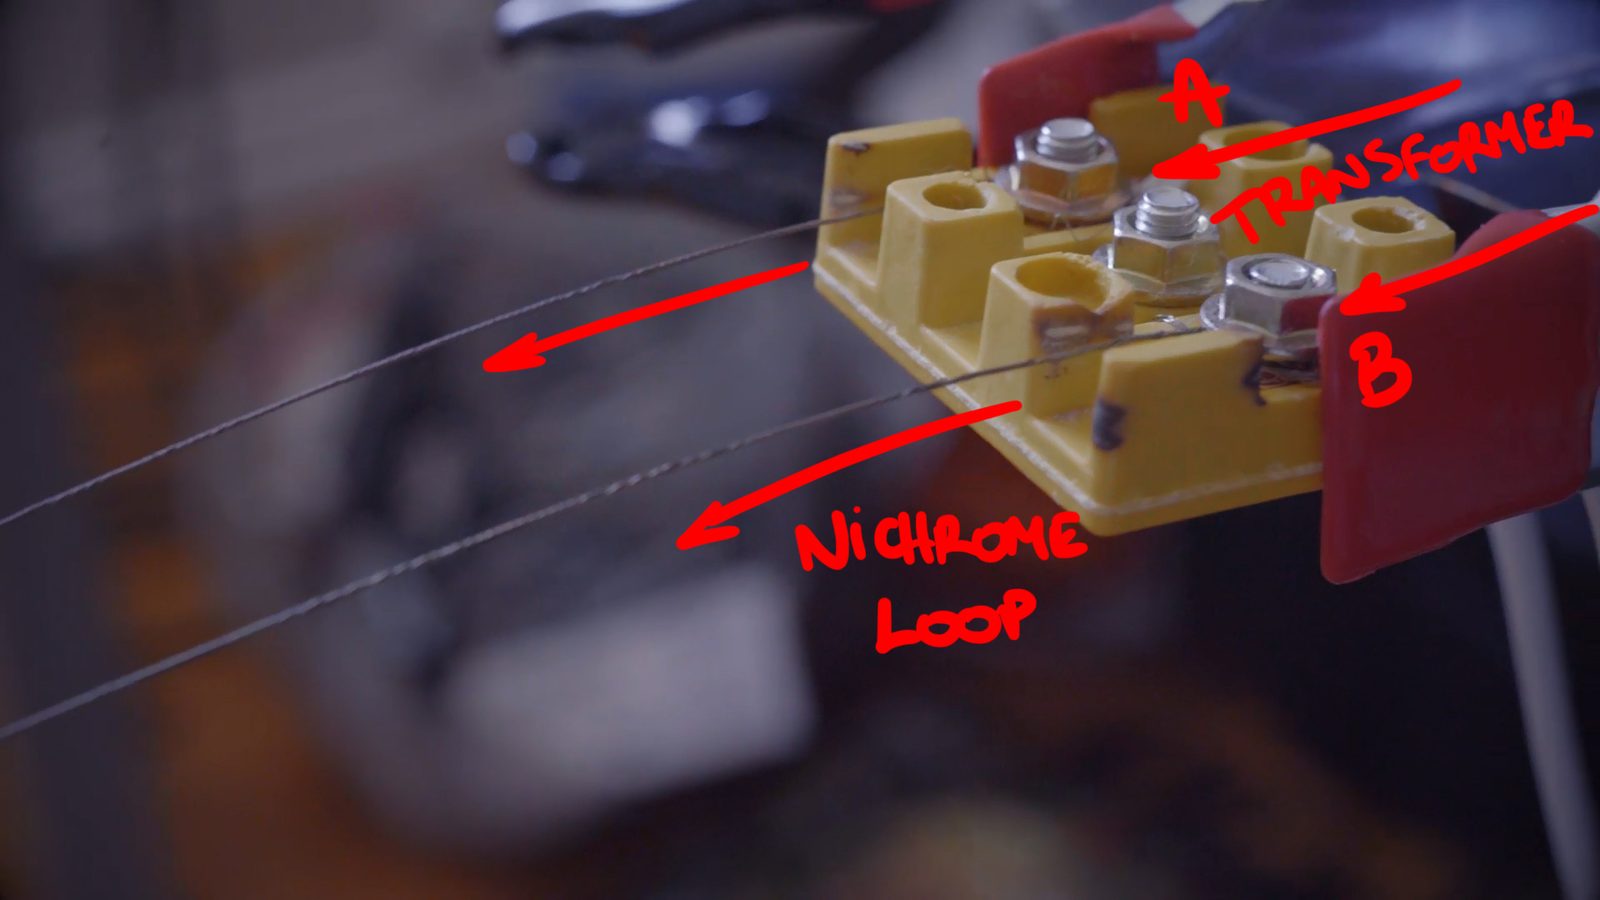
Now, the electrical rig. Connect the transformer to the wires and the wires to the ceramic box (this thing is meant to resist great heat and contain electricity). Now make your nichrome loop - my wire was too thin (gauge 34) so we had to make it thicker, since the heat was melting it right off the bat. Connect the loop to the ceramic box too. The nichrome wire works as a resistance and heats up as electricity passes through. I highly recommend using an extension with its own fuse instead of connecting this contraption directly to a wall outlet.


Step away from this for a second, fill your spray bottle with water and put it in the fridge.

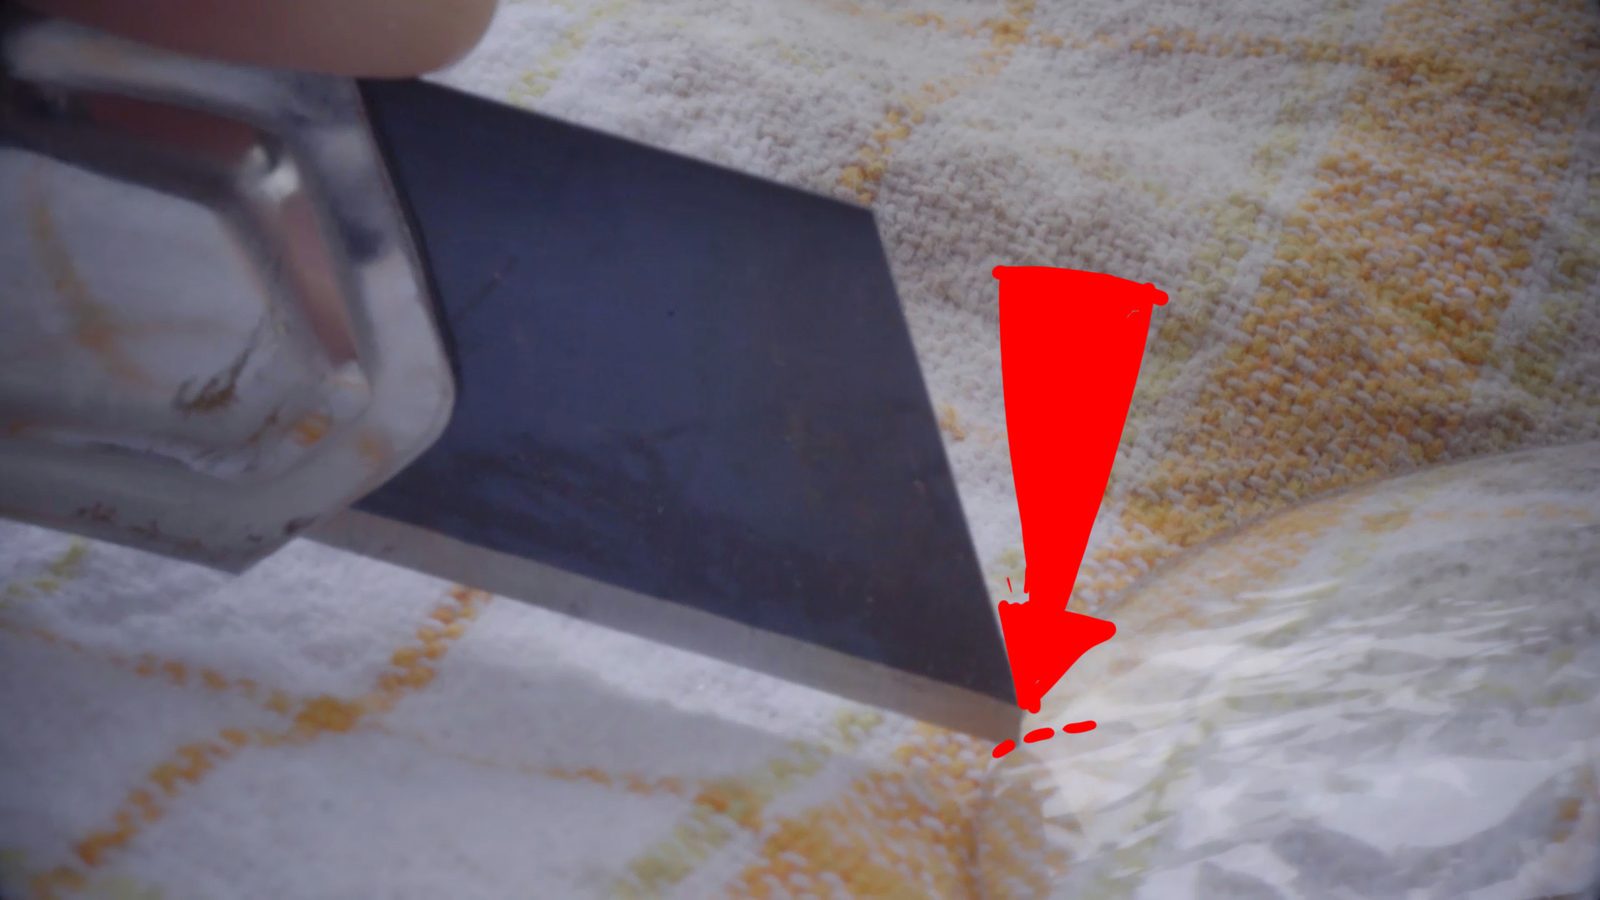
With your diopter, ruler and exacto knife, head outside. It's time to score the edges of the diopter to hold the wire in place. Use a piece of cloth as a base so the glass doesn't get scratched and there's some tolerance for the pressure you're applying. Don't put too much pressure or you'll break the lens, but if you do it too lightly you won't carve the line you need. WEAR MASK, GLOVES AND GOGGLES for this. Glass dust is a mean thing.

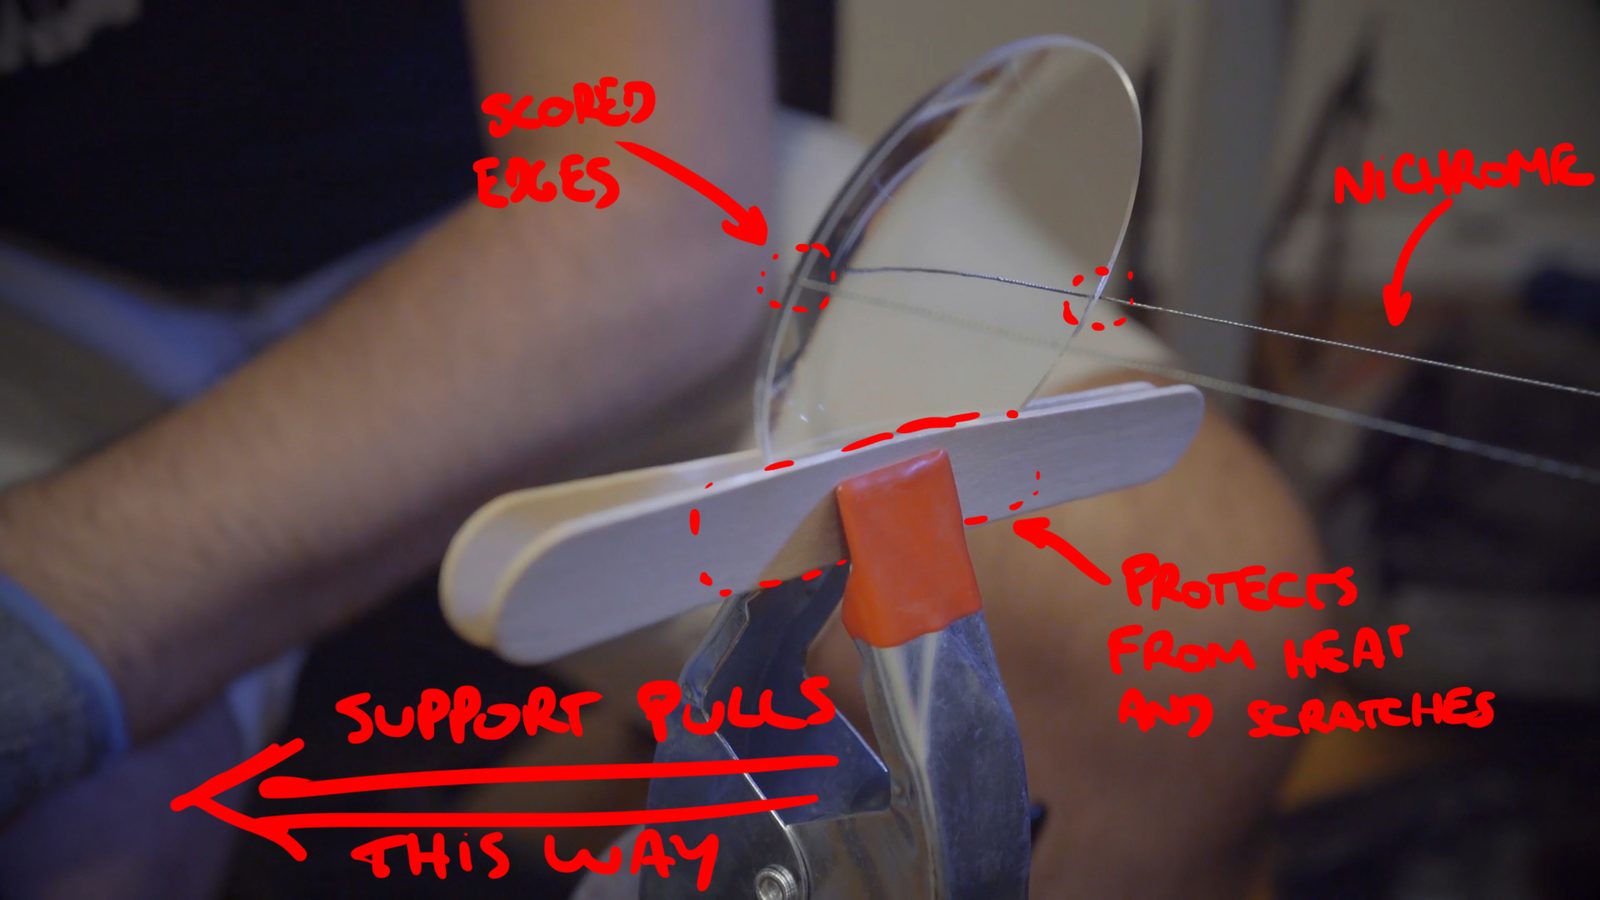
Back to the wiring, rig up everything to hold the lens in place. Don't hold it with your hands for cutting: the wire goes over 800°C and the glass heats up as well, so you don't wanna hold that. We used a bunch of clamps to hold the ceramic box and another two (attached to a tripod as a flexible arm) to hold the lens in place. The two popsicle sticks make sure the clamp isn't scratching the glass. The sticks also handle the heat. Fit the nichrome wire on both sides of the lens using the cuts in the glass. The wire should run right through the middle of the diopter. We used the convex side so the lens itself helps in keeping the wire stretched. You want it to be as stretched as possible, applying some counter-pressure to the glass.

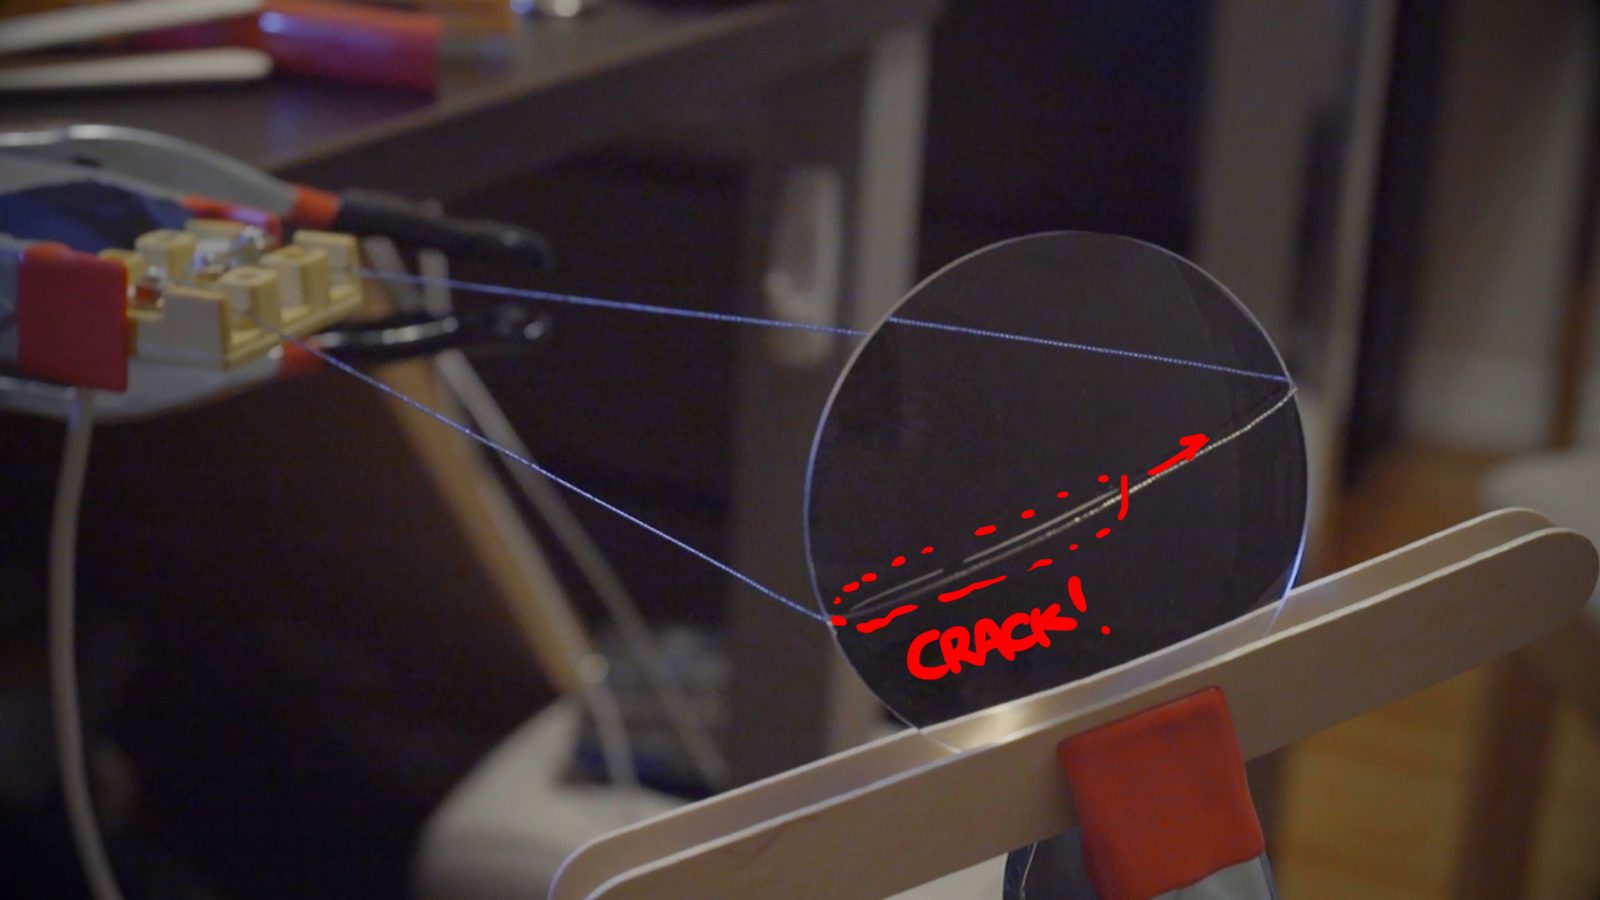
This is the hard part, it's also when magic happens right before your eyes. Turn on the transformer and wait for the wire to heat up, give it a good minute. Turn it off, spray the glass with cold water. Heat it up again, spray it with cold water. It takes time. My transformer was at the very edge of dying while we did this. You'll be motivated to continue since you're able to see the cracks forming through the glass. The center is the thickest part, and it's a pain, but eventually it'll give in. As a reference, the entire process took about four hours for me, but we were still figuring things out along the way.


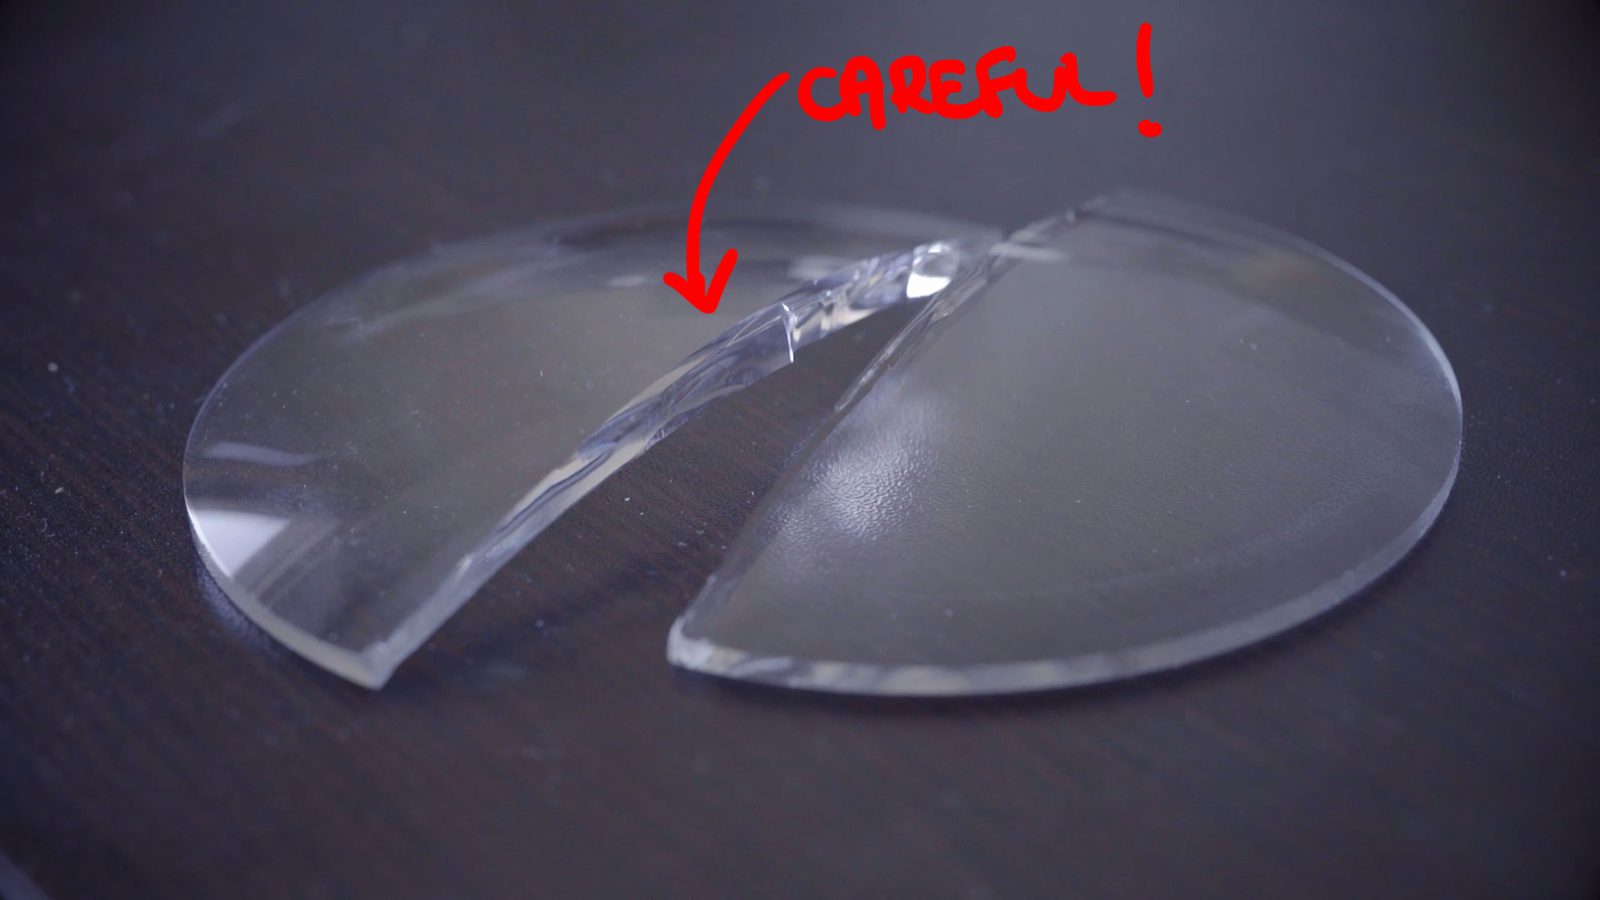
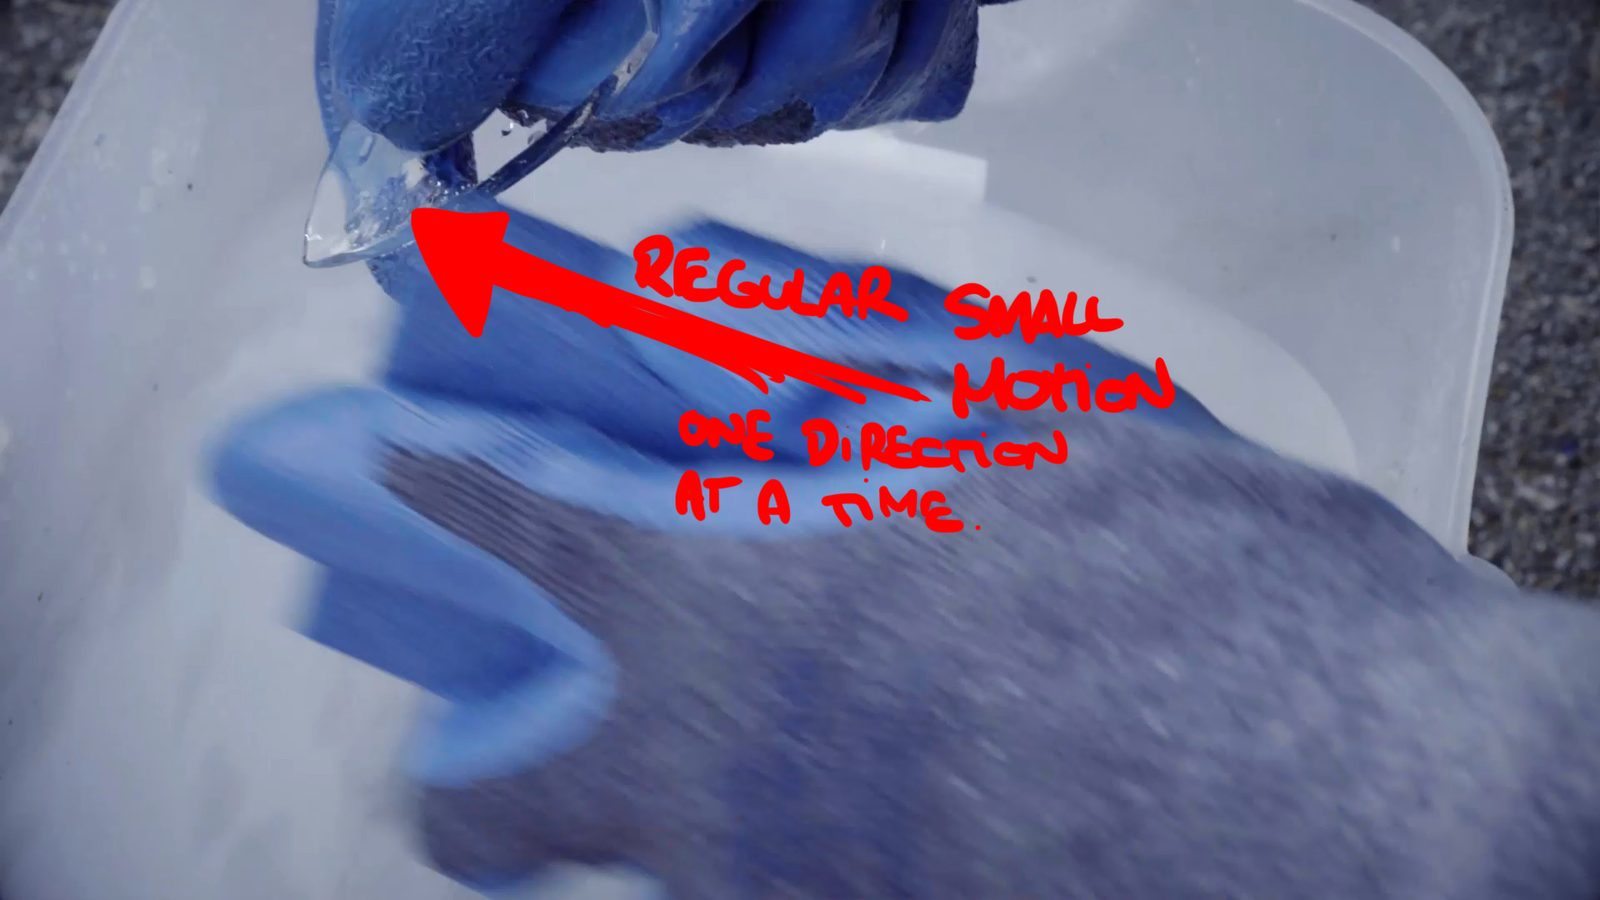
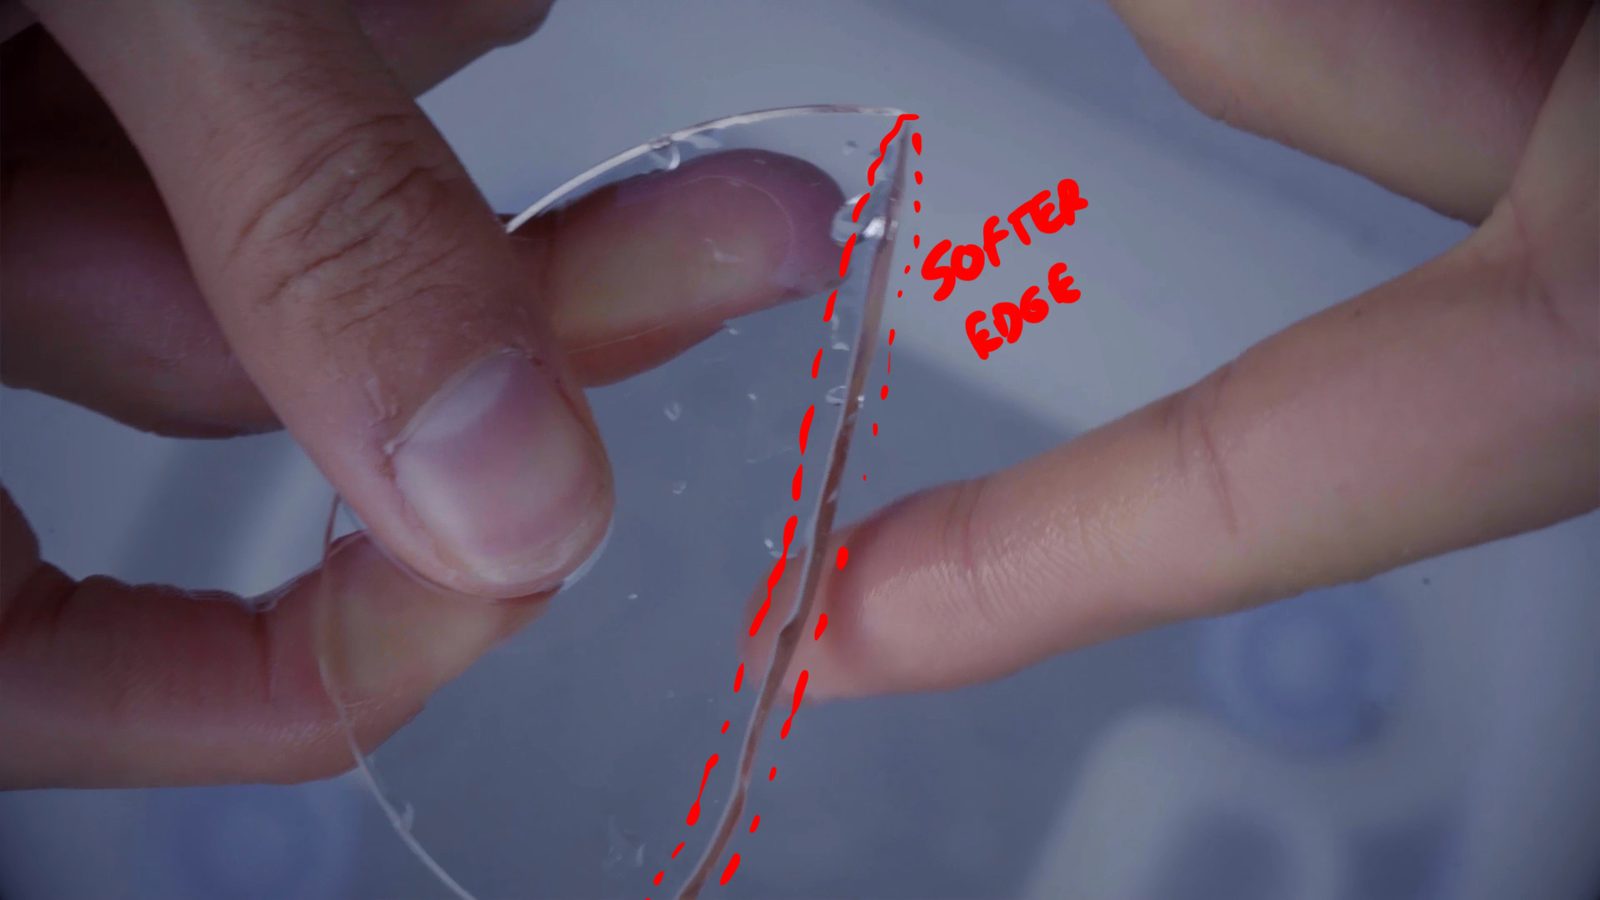
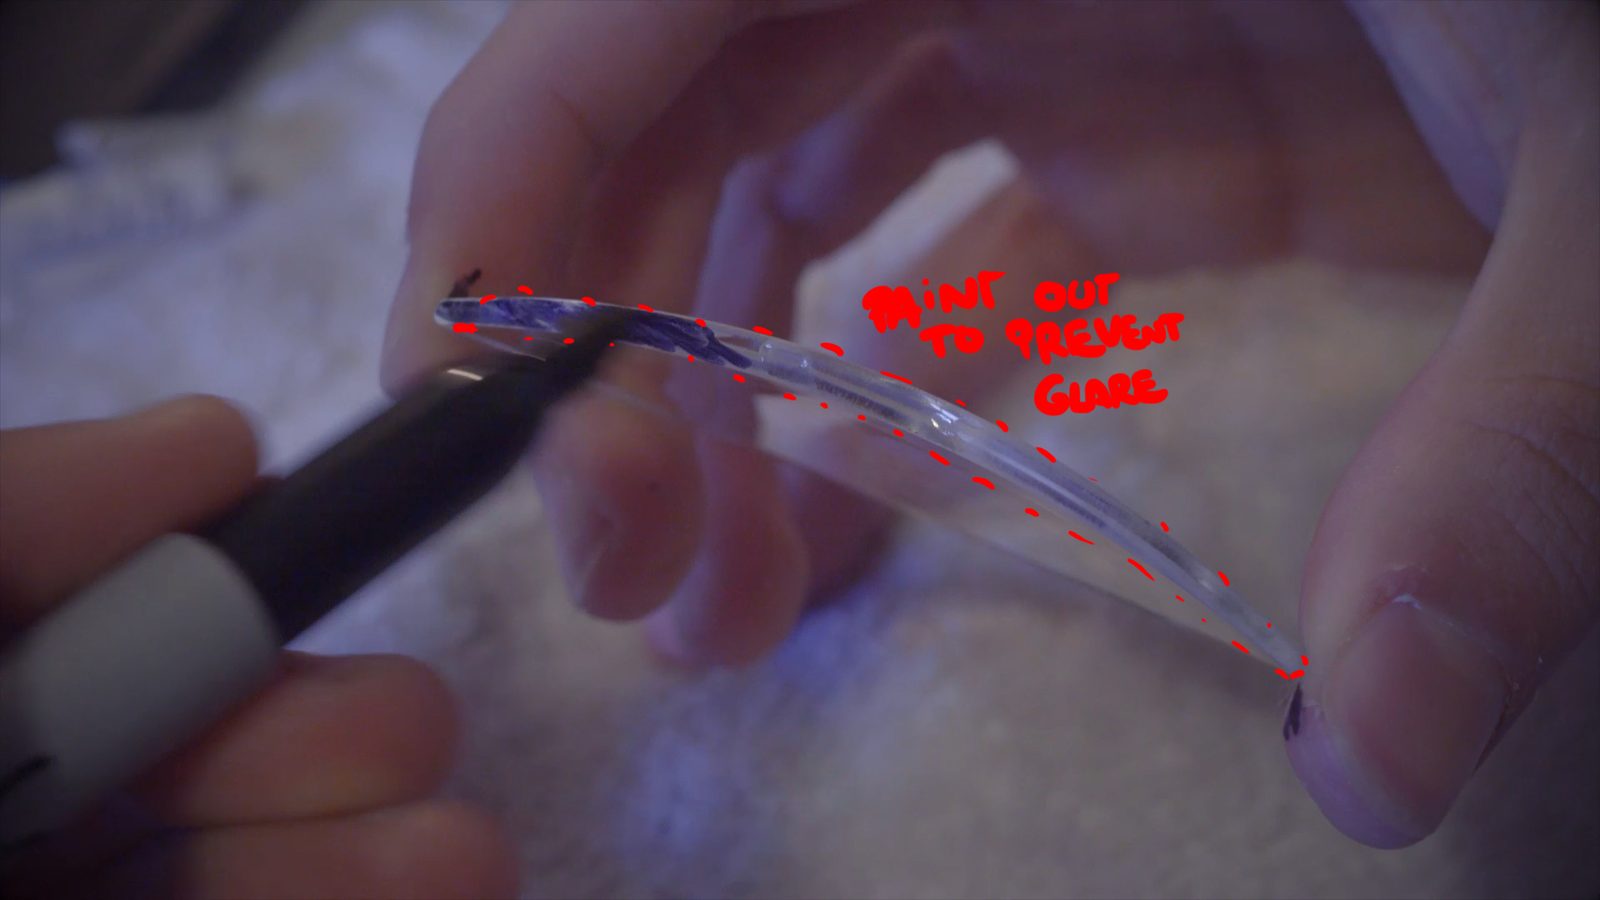
This will get you two halves of a circle and an edge that tries to cut you just by looking at it. Once more with your mask, gloves and goggles, head outside. Grab the sandpaper and the bucket of water. Using a coarse sandpaper (or sanding sponge, in my case), submerge the glass and sand the edge away. Don't do it flat, always sand the glass at an angle to smooth it out. This step takes a reasonable amount of time. When the edge is straight, switch to a thinner grade sandpaper for finishing it up. Now you have a friendly edge that won't chop your fingers off, the problem is that the white of it will introduce a terrible glow across the frame. Using the black sharpie marker, paint it the best you can. Since you sanded it down, the ink will stick for good.


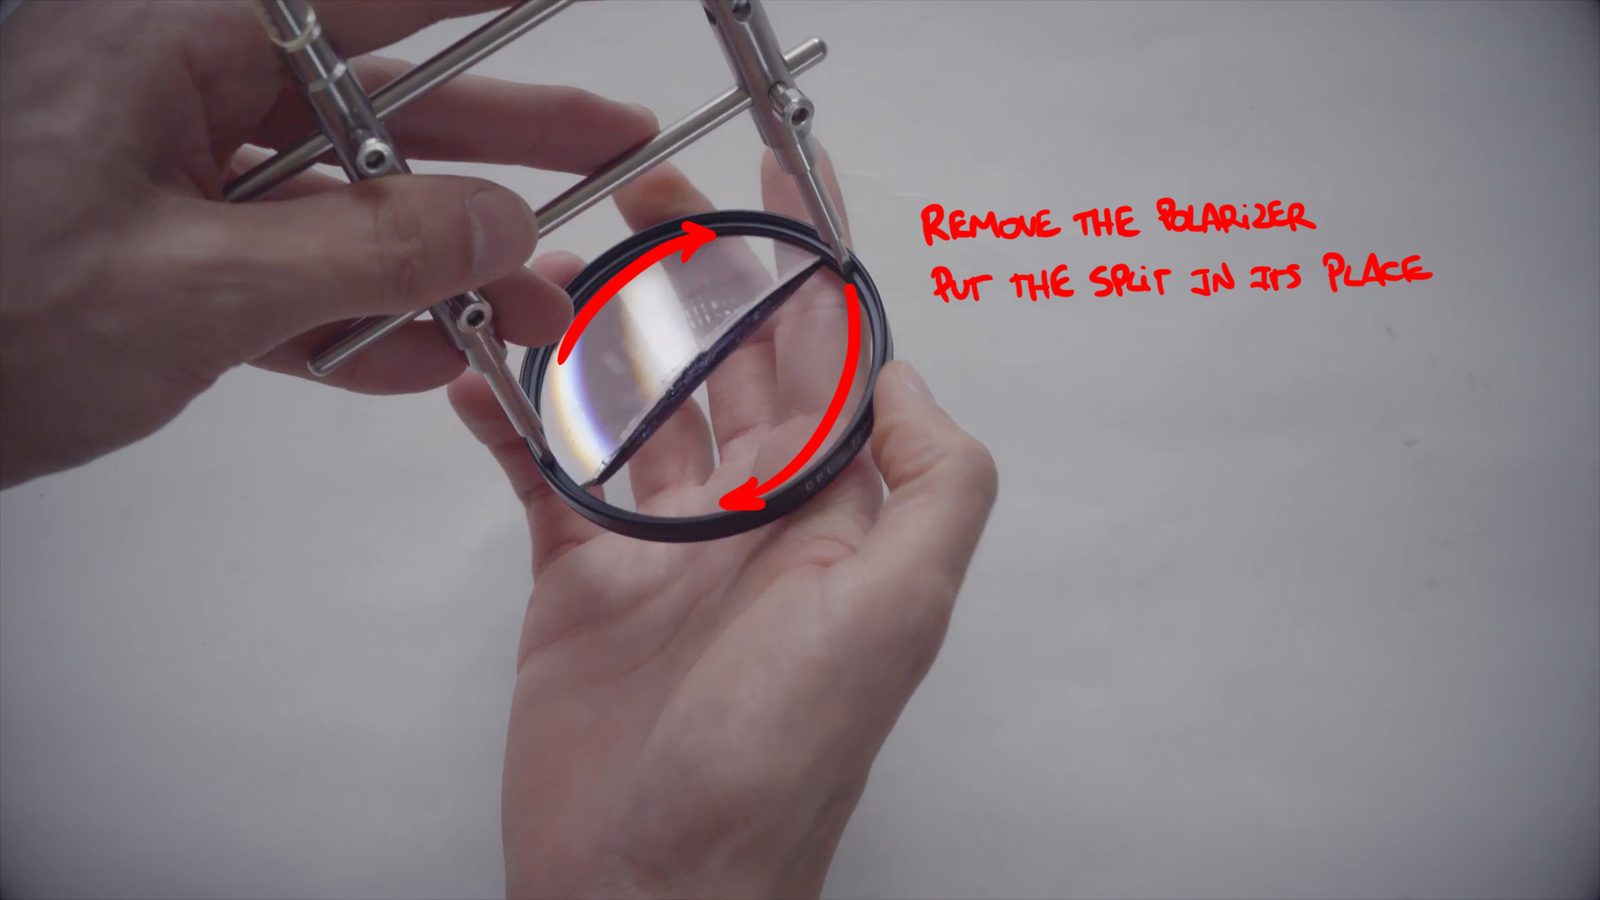
The last step is to get the glass and mount it onto the circular polarizer ring, so you can rotate it as you please once you put it in front of your lens. On the bright side, each set of diopters gives you TWO sets of split fields so you can keep the leftovers as backup gear.

Last minute advice, if you're thinking of trying a different method than the wire, I did that for my first diopter. I tried the flaming thread method, then a glass cutter, both failed. We ended up hammering a ruler to the line down the middle of the glass. It cracked unevenly, of course, and I had to sand down 1/8th of an inch on the good half of the diopter. It doesn't look like much but it took me three and a half hours to dust it and the resulting split still could use some more polishing to get straighter.

As mentioned before, I had tons of help from Bruno Nicko for this tutorial, so you should definitely check out his channel for more extreme DIY projects. Let me know if you got the guts to try this out and how the process goes! I'll get back to work here because Vancouver is sunny for a change and I gotta shoot as much as I can to keep you all busy! Subscribe to the channel and check my blog for more tutorials and anamorphic stuff! See you soon.

In case you wanna see some more split field in Hollywood, here's a supercut! Music is a bit off, but the technique is well represented and you can see which ones are split diopters and which ones are done in post!

Anamorphic

Anamorphic Chop Shop - Magic Lantern

May 29, 2016

Since I'm switching from Canon to Sony, I thought MagicLantern deserved a departing video, since it's an amazing tool for anyone shooting with Canon cameras, and super useful for anamorphic users.

USEFUL LINKS:

All the RED links on this post are part of eBay's Partner Network, so if you purchase anything through them, you're helping me to keep this project going.

You can support this project on Patreon. Make your contribution and help the Anamorphic Cookbook!
My first camera was a Canon XSi, later on I stepped up to the 7D and not long after that I had a Canon 5D3 and a T2i as B-cam. Long before I started into anamorphics I found out about Magic Lantern, a sort of "hack", even though I prefer the term add-on software, that can run on most Canon cameras. Magic Lantern itself is absolutely awesome for enabling zebras, focus peaking, crop marks and many other tweaks otherwise non-existent on the original Canon firmware. A group of hackers and programmers started to study Canon's source code around 2009 and quickly achieved some advantages over the original firmware. The software is free for anyone and can be download from its official website. I have used from 2010 to 2016 with zero major issues, and a few bugs that only required me to pop off the battery and reinsert it.

Magic Lantern became extremely popular in 2013 for enabling RAW video recording on many Canon DSLRs, and RAW absurdly improves image quality over the original H.264 codec, you can see some comparisons here and here. I can honestly say it was Magic Lantern and RAW recording that made me hold on to my 5D3 for so long. The only issue is that you need tons of fast cards. I tested the workflow on several personal projects - including Zona SSP - and have used it for all the reviews in this channel until after the Isco Widescreen 2000 review, when I switched to the Sony A7s2.

Zona SSP

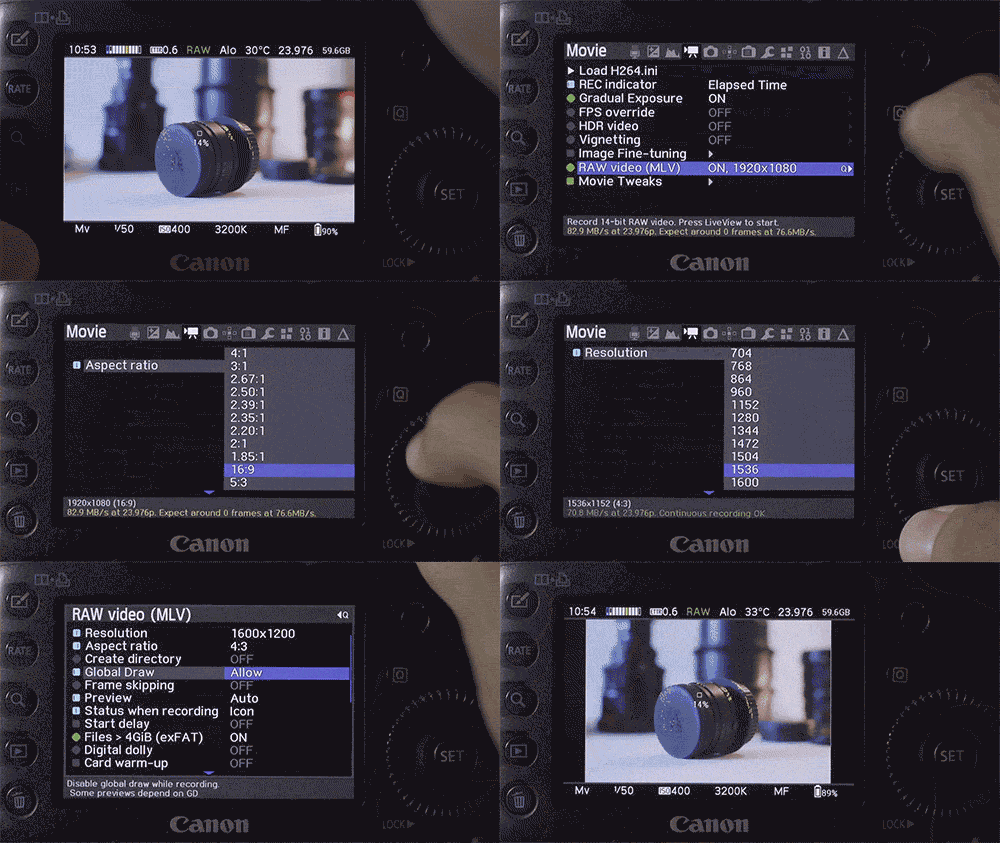
The common ground between shooting RAW and using anamorphic lenses is the ability to pick a non-standard "recording window" from the camera's sensor area. If I set a recording window to 4:3 and use 2x stretch lenses, the final output is 2.66:1 instead of 3.56:1. Shooting with a shorter aspect ratio also avoids wasting footage that would be immediately cropped in post. While shooting RAW, these guidelines show you what's being recorded, so they're your key to framing.

To change the recording resolutions, go in the "Movie" tab, then "RAW video (MLV)", enter its submenu (Q) and open the "Aspect Ratio" tab. There you can change it freely. I'll go with 4:3. Then you can go in "Resolution" and adjust the size according to your preference. For 4:3 I usually go with 1600x1200, then so you know what you're framing, set "Global Draw" to Allow (the default is OFF). If you want more information on how to shoot RAW, there's plenty of tutorials around.

CUSTOM CROP MARKS

My first contribution to Magic Lantern was way before RAW video, and it's still useful for cameras that can't handle RAW: custom anamorphic crop marks. These are overlays placed on top of the image that is being shot, allowing you to preview a different frame format than the one that is actually being shot. This guides my framing based on the final aspect ratio I want for the video. The Anamorphic Calculator is a great tool to help you with that too.

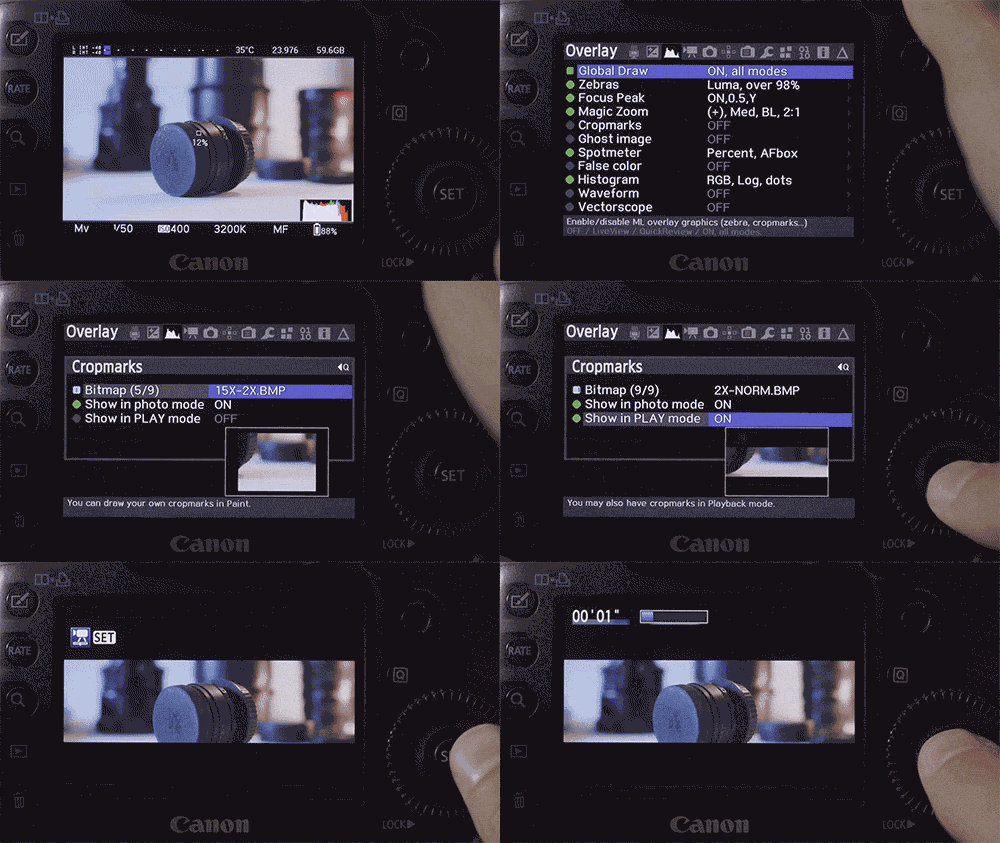
Since mixing stretch factors in the same video is a common thing (more than once I used a 1.33x stretch lens for some shots and a 1.5x or 2x stretch for others) we know that something is gonna be cropped off later (either top-bottom or left-right of the frame). From here, I created nine unique crop marks that allow mixing any kind of lenses (from spherical to 2x) always showing what's the core framing and what will be cropped. To install them, just copy the BMP files to the ML/CROPMKS folder in your card. You'll have to remove any other cropmarks, as the limit is nine.

To enable them, go on the "Overlay" tab, then into "Cropmarks" (Q) and choose the one you want. I also like to enable "Show in PLAY mode", so when I'm reviewing the footage I can see what's going to be cropped.

File names look like some sort of code but I promise they make sense: the first value is the final aspect ratio, according to the lens stretch. 1.33x stretch results in 2.4:1, 1.5x equals 2.66:1 and the monstrous 2x goes as wide as 3.56:1. The second part of the file name is for the kind of lens being used. Let's say my whole project was shot with 2x stretch and I'm going for the 3.56:1 aspect ratio. After principal photography is done, I have to shoot some extra footage using spherical lenses. In this case, I need to pick the "2x-norm" crop mark for the extra footage.

ON SET PREVIEW

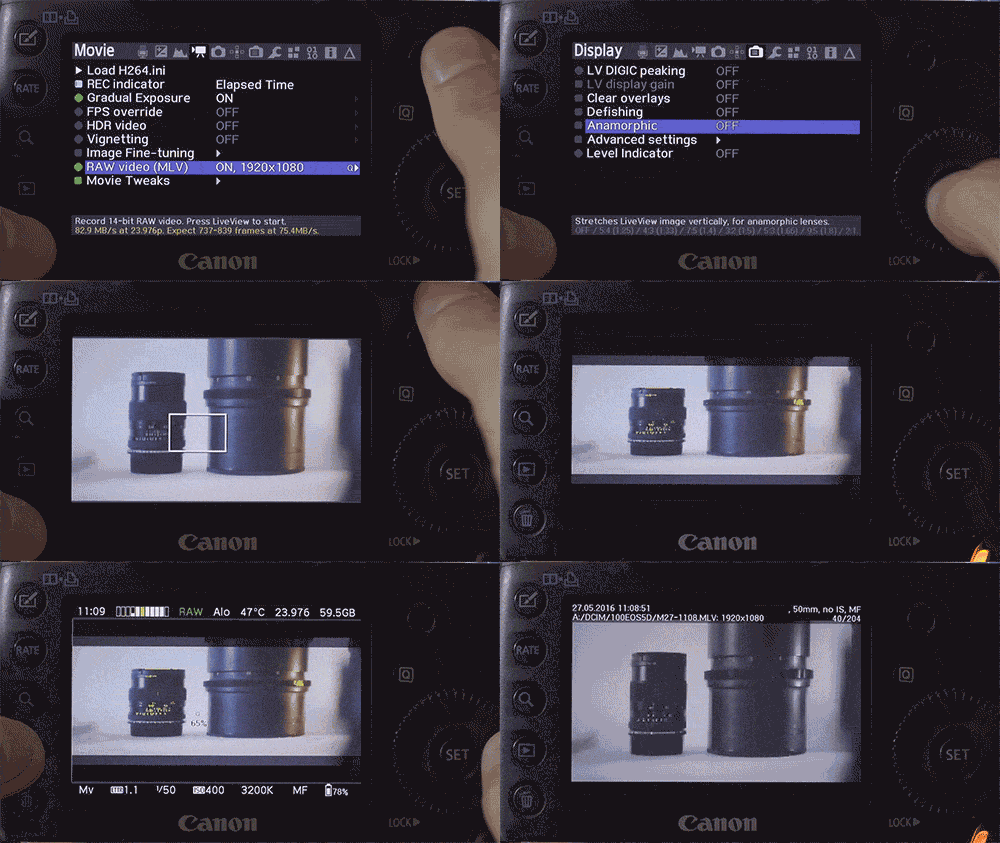
One of my main concerns shooting anamorphic was how to take a look at the footage on set at the correct aspect ratio, not squeezed like it's shot. This is really easy to solve through Magic Lantern. In the "Display" tab, there's an "Anamorphic" submenu. This submenu offers the most common lens stretches. By selecting one of the values, this stretch is applied to the LiveView and you see things in the right proportion while shooting. Its only flaw is the fact that it doesn't work when you're reviewing your clips in Play Mode. Developers informed me that messing around with Play Mode is complex and risky, but it works great with RAW recording!

If you're handling the camera by yourself this is a great solution for it eliminates the need for any other piece of gear devoted only to fixing the images' aspect ratio.

I thought Magic Lantern deserved this video since it was my loyal companion, making my life easier and the results better, through these years of shooting indie anamorphic projects. I miss the custom crop marks and LiveView stretch every time I'm shooting bare bones with the A7s2 and I'm still getting used to life without it. If you're shooting with Canon and haven't tried Magic Lantern yet, waste no more time. Just before you do that, remember to subscribe and quickly check the blog for more reviews, downloads and tutorials! Ferradans out.

Day-to-Day

Bike Theft - 12-hour Thrill Ride.

May 26, 2016

This morning someone tried to break into our house by punching in a window screen. Ariana and I were both still in here and we heard a loud noise, but we dismissed it as Finnegan - the cat - does that sometimes. When getting ready to leave, Ariana headed for her bike and found... nothing. The bike was gone, probably taken by the same person who punched in our window screen and bailed after the noise.

At first I thought our other roommate had taken it to work, since both of her bikes were still in the garage. Then we noticed all the bike locks were accounted for, and the distinctive stuff about Ariana's bike - mudflaps, lights, blue helmet - was in a neat pile by the gate. That was when I noticed the skewed window screen and linked it to the weird noise. It was at 10h30am.

Ariana immediately called Vancouver Police's non-emergency number and reported the situation. Since both of us were leaving soon, VPD said officers would stop by around 2pm. In the meantime, we set up an alert for the stolen bike on Project 529's website and shared it on facebook. 529 Garage is a website that links owners and bikes and is connected to Vancouver's Police Department. It's an easy way to prove ownership in case of stolen bikes, since they track model, serial number and include pictures of the bike. Their registration fee is $20, and after today I believe it's more than worth it.

With the alert out we headed our way. On the train I contacted our landlord to tell her about what happened and if she had any valuable advice. She mentioned that the house across from ours - in the alley where the bike was taken - had security cameras pointed to our garage. She also said she would be stopping by later to catch up on the situation and help us with making sure that no one would try to break in again. On facebook I got good tips from a friend - keep an eye on craigslist, check Hastings and Main, look out for shitty paint jobs, as the thief might've sprayed the bike to change its look, and DON'T engage with the thief if you find the bike: call the police.

On the way home, we were rooting for that security camera footage. Hopes up, just to be crushed down by finding out it was a fake, an empty shell to scare away burglars and thieves. I guess we should get some of these too.

It was around 5pm and the police hadn't shown up yet, so Ariana called them again, and they said the officers would stop by at around 7pm. In the meantime we went to the garage, grabbed everything valuable that was stored there and brought it all inside.

By 6h30pm, Natalia and I were trying to cheer up Ariana with ice cream and brigadeiro, talking about the crap life throws our way and she told us the sentimental story about that bike - her first prized possession, bought with her own money, and that she carried everywhere she moved. That part we knew about, since we were the ones who helped putting the bike back together after she brought it, in pieces, from the US. Things were looking bleak.

As soon as we leave the room, Ariana goes "GUYS, I FOUND MY BIKE". It was on craigslist. No doubt it was hers. The address on the map was five blocks from our house. She replied to the ad, playing it cool, asking if the bike was still available. She was calling the police again when someone knocked on our door. Two officers, Rebecca and Caroline, were here to help us. Ariana went over the entire plot with them, showed the listing, we went to the backyard, checked all the times for the noise and bike theft, looked around and headed back inside. Upon leaving, they said to contact the non-emergency number if her email on craigslist got a reply and mention the case number so they would be updated.

In the meantime we were desperately looking at the photos on the craigslist post, trying to figure out where the bike would be, and checking with google maps the houses in that area, placing bets on which of them was holding the bike and coming up with plans to get it out. We never intended to actually go there, but, man, we were so angry. Natalia and Ariana finally agreed on which house they thought the photos were taken.

It had been about hour since her email, so we decided to create a fake email account and email the person again, low-balling the price. Bruno then took the alias of Todd, and sent a message offering $270 for the $300 listing. He got a reply in a few minutes, including the seller's name, address - the girls were right about the house! - and phone number. We were all exultant. Ariana called the police again, while Natalia called the officer directly - leaving her a trumped voice mail as Ariana's call was picked up. They called her back and said they would stop by in a few minutes to brief us in what was going to happen. They also instructed us to set up a meeting with the seller, at the near skytrain station, at 10pm, and, in the message, say we would text him upon arrival. Todd was doing great spy work, posing as a West End dude casually stopping by East Van to grab a bike after work.

The meeting was set and the posting was deleted from craigslist. Officers Rebecca and Caroline showed up a little after 9pm to get all the information and proof they needed to check if that was Ariana's bike. Ariana also wrote a statement about what happened, in detail, including info on the bike like serial number and a Chicago-bike-shop sticker. Go Village Cycle Center!

By 9h40 we were still waiting on the plainclothes cops who were going to pose as Todd and his buddy. I started to worry they would miss the 10pm meeting, but they quickly showed up and got all the notes they needed to check the bike. With ten minutes to spare, they all left and the four of us (Bruno, Natalia, Ariana and I) were in a state of extreme mixed emotions, from "THEY WILL DEFINITELY GET THE BIKE BACK!" to "what if the guy doesn't show up and the bike is gone for good?" and everything in between those two scenarios.

After the most painful thirty minutes, we heard a knock on the door and Ariana rushed down to get it. Officers Rebecca and Caroline were there. With her bike. It turns out the guy said he bought the bike this morning from another guy and without any evidence, it's impossible to charge him for stealing it. The difference is that now he has a record for possession of stolen goods, and if that pattern repeats, well, too bad for him. They also said Ariana did all the right things with contacting the non-emergency number, playing as instructed and letting the police sort out the situation without trying to solve it by herself.

The whole thing felt way longer than twelve hours but, there it was, solved by 10h30pm.

Later on we got another message from the seller to Todd, our coverup identity, saying he learned his lesson and pointing to another craigslist post where he said he got the bike from. Doing some light digging on the other post's name and phone number, Bruno found a guy selling all sorts of crap for ludicrous prices out of a basement on Kingsway, not too far from here. The stuff ranged from graphics cards for $5 to full working computers and bikes. A distribution center for stolen goods, apparently. Ariana forwarded all this information to the police, it would be good if more people could recover their things.

All in all we got very lucky with the whole turn of events and VPD didn't let us down. All of us had a really hard time going to sleep after this was over, for all the ups and downs along the day and the adrenaline still pumping in our stream.

Anamorphic Specials

Anamorphic on a Budget - 1.33x Shootout: "Intruder"

May 22, 2016

A brief explanation of the motivation to shoot "Intruder", a 1.33x anamorphic head to head shootout. A short intro about using a new camera and my first experiences with 4k.

USEFUL LINKS:

All the RED links on this post are part of eBay's Partner Network, so if you purchase anything through them, you're helping me to keep this project going.

You can support this project on Patreon. Make your contribution and help the Anamorphic Cookbook!
Ever since I reviewed the Isco 16:9 Video Attachment I, the only 1.33x anamorphic I was missing in the reviews was SLR Magic's. Now that I have it here, I wrote a very simple and straightforward script then got a ton of help (and patience!) from my friends while shooting this side project mixing all the 1.33x attachments in unmarked shots to see if we can actually spot the difference between them. Thank you very much Nicko and Ariana, you are the best.

Shooting this was all kinds of crazy since I was constantly swapping taking lenses, anamorphics and diopters (every single shot!) and keeping track of which shot had which combination was a complex task but not more challenging than shooting it all in a single Saturday afternoon. It was a fun project and also my first time shooting with Rob's Kinemini, so I took advantage of the S35 sensor + SpeedBooster to match full frame and shot it all in 4K Cinema DNGs without having to worry about crop factors and math (the resulting crop factor was 1.066x, which for me can be considered 1x).

Telling which shot used which lens, without looking at my notes ended up being much more difficult than I expected. A few of them are easy to spot thanks to more visible features - SLR Magic's super blue flares, the Panasonic's super wideness and poor edges, the Isco's oval bokeh - but when these features are not so visible in the shot, it's blind luck trying to tell which lens was used. Check the list below for full specs. How many did you get right and which ones are your favorite shots?

Before I end this video, I would like to point out the amazing score composed by my friend João Gabriel Rodrigues, he was my classmate back at Film School, and he did an outstanding job coming up with the music from the most bizarre set of notes I ever wrote about what I wanted for the mood in this project. If you're looking for good music, he's a freelancer and works super fast, so you should definitely get in touch!

What did you think of this alternate method for reviewing lenses and putting them against each other? Leave a comment below, subscribe to the channel and drop by the blog for the extra anamorphic content! Ferradans out.

Also, here are the reviews for all the lenses used in this test
Century Optics 16:9 Ratio Converter - on EBAY
Century Optics WS-13 - on EBAY
Panasonic LA7200 - on EBAY
Isco-Optic 16:9 Video Attachment I - on EBAY
SLR Magic Anamorphot 1.33x-50 - on EBAY

Anamorphic

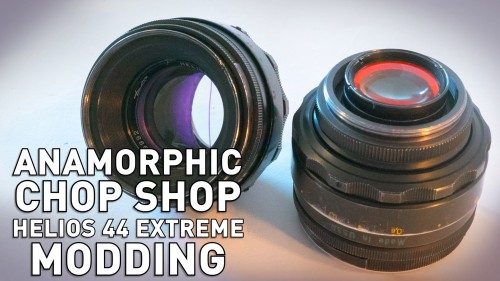
Anamorphic Chop Shop - Helios 44 Extreme Modding

May 8, 2016

Following up on the previous video, here's how to do your own custom mod of the Helios 44-2. Feel free to shoot questions on the comments below.

USEFUL LINKS:

All the RED links on this post are part of eBay's Partner Network, so if you purchase anything through them, you're helping me to keep this project going.

You can support this project on Patreon. Make your contribution and help the Anamorphic Cookbook!
If you wanna take a shot at getting one of these purple lenses, join the raffle below! As the master at VintageLensesForVideo says, "Giveaway is open to everyone, everywhere in the world. Good luck!". The lens is Nikon mount (nothing an adapter can't handle) and has a focal reducer at the back. It's a different lens than the one in the tutorial and is a little beaten up. Aperture has a few quirks, you gotta loosen the entire barrel to rotate it, but it's still a great lens to play around, disassemble and learn how it works. Focus is great, so if you just want it wide open for maximum craziness, this is the one for you!

Besides that, I still have some available for sale, because I need to recoup the money spent in this tutorial (three Helios lenses, cans of spray, oval apertures, polish). Get your own righ here on eBay!

a Rafflecopter giveaway

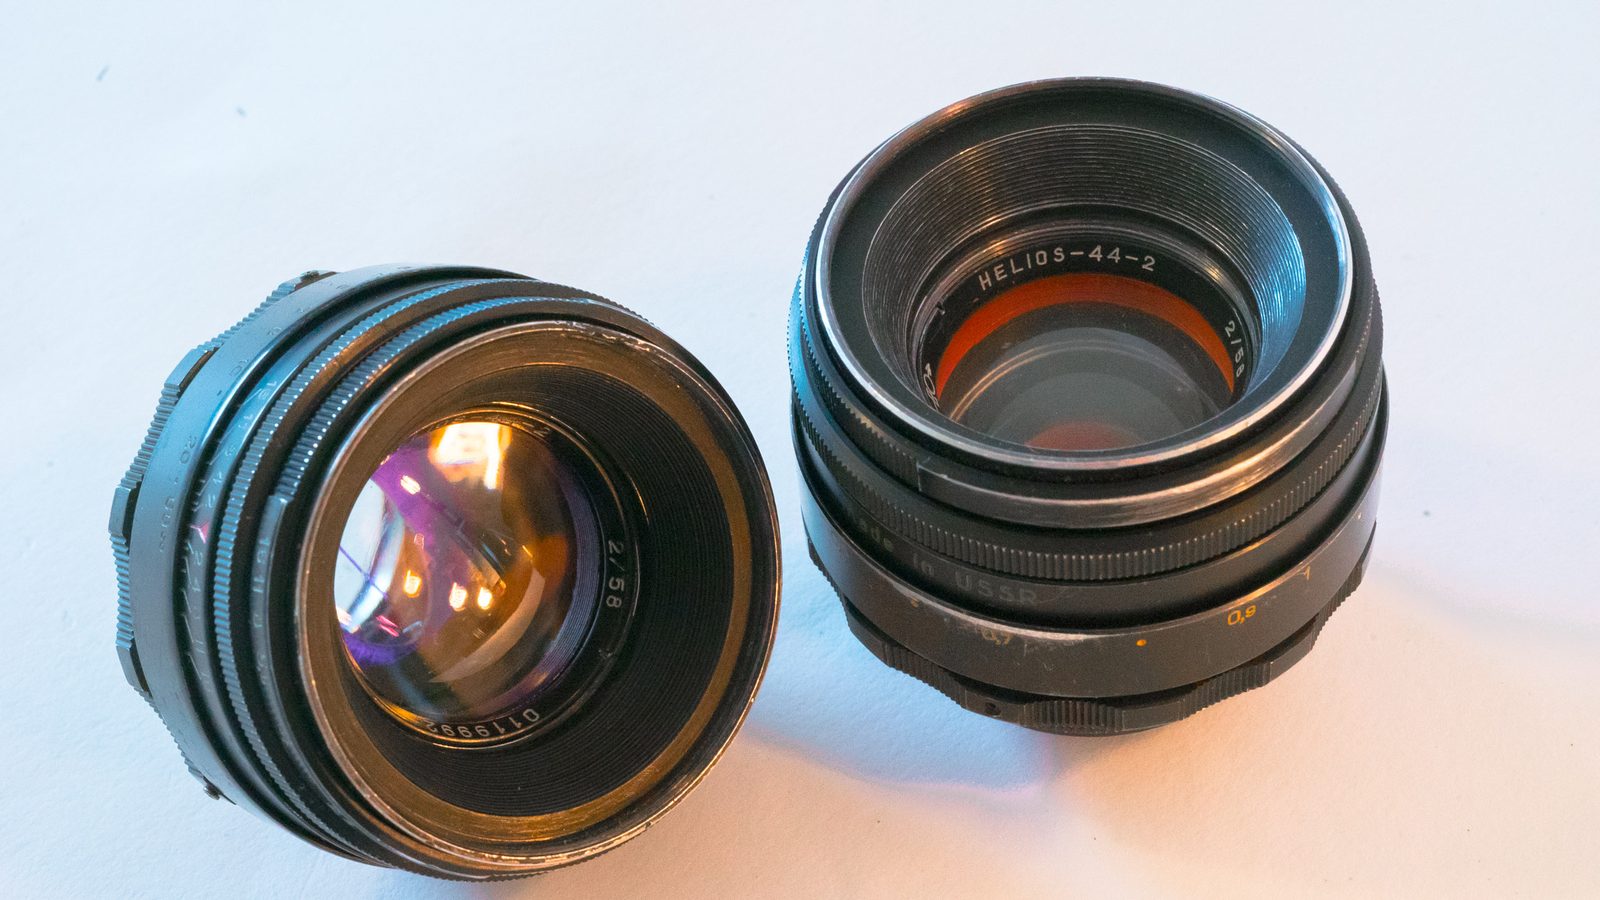
Tito Ferradans here for a lengthy video involving some serious modding and unique looks. Summer is here and DIY projects are up. A few weeks ago I was blown away by a few photos posted by one Victor Danell with a modified Helios 44. His process was to "polish" the glass elements with a strong abrasive and sand the inside of the barrel in order to increase how light bounces around. The resulting effect is a light and wonderful glow to the brighter areas of the frame. It's an effect I was trying to re-create in post since forever and having the opportunity to do it in-camera was just too much to resist. Then I pushed the concept a bit further, painted some things inside the lens, replaced the aperture and added a flare filter inside the lens as well.

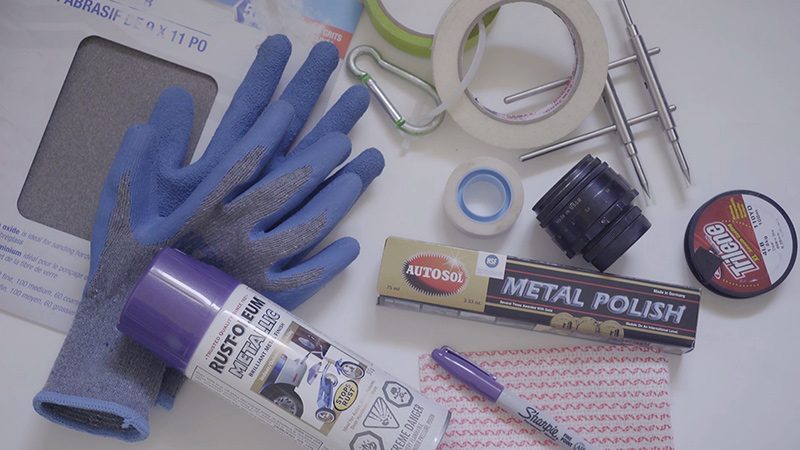
What are you gonna need for this process: a lens wrench, Helios 44-2, metal polish (I used Autosol, following Danell's instructions), a piece of cloth, some sandpaper (I used 100 because I did the whole thing by hand), masking tape, a can of metal paint, transparent tape, sharpie markers and thin fishing line. I highly recommend you take photos along the process so you know what goes where and to be able to put the lens back together. There are a couple of videos around on how to disassemble and clean the Helios, so this isn't one of them. I didn't fully disassemble the lens, just took out the minimum I could.

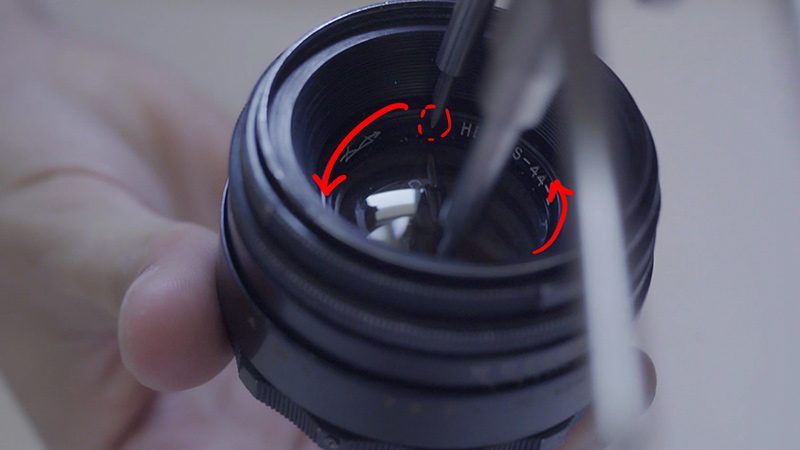
Starting by the back, unscrew the rear group. Now the front. The inside of the barrel has a slot for the lens wrench, so twist it out. The front is much easier than the back. Once the ring is removed, the element pops right out. Place it on the desk. Give the lens a gentle shake and the second element will also fall on your hand with a spacer. Onto the back group, unscrew the glass out. If you're having trouble with grip, use rubber gloves! Now get the piece of cloth, add some metal polish to it and uncoat it all away. This process creates countless micro scratches on the glass which are the main cause for the glow since light bounces through them. To completely remove the polish I washed everything in water, dried and let it dry some more on its own.


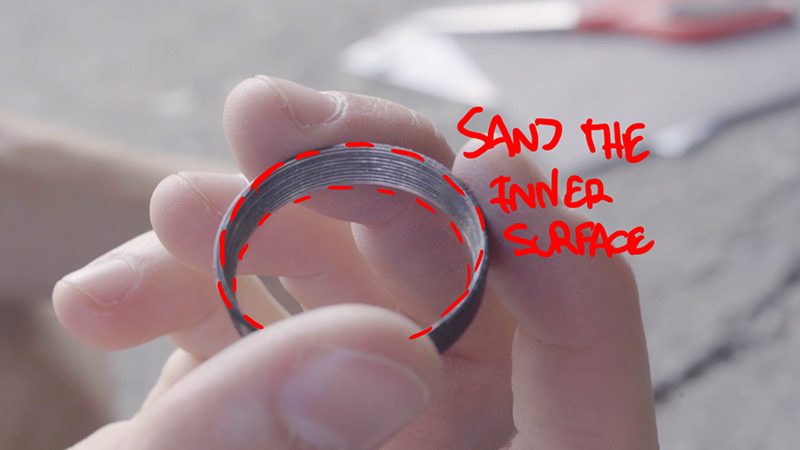
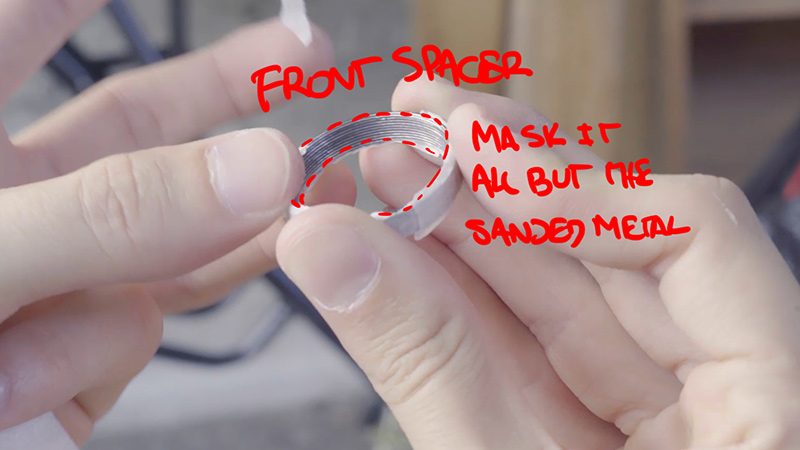
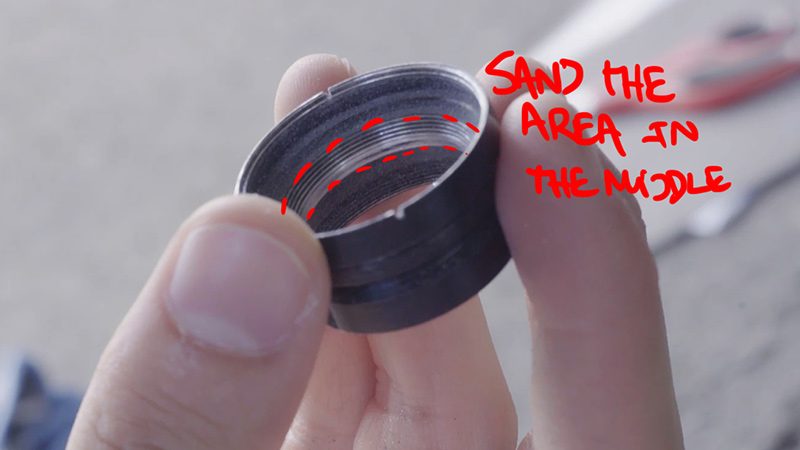
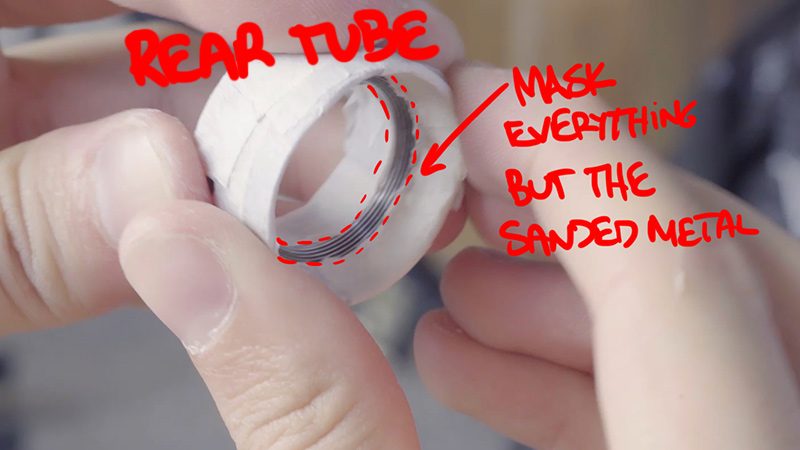
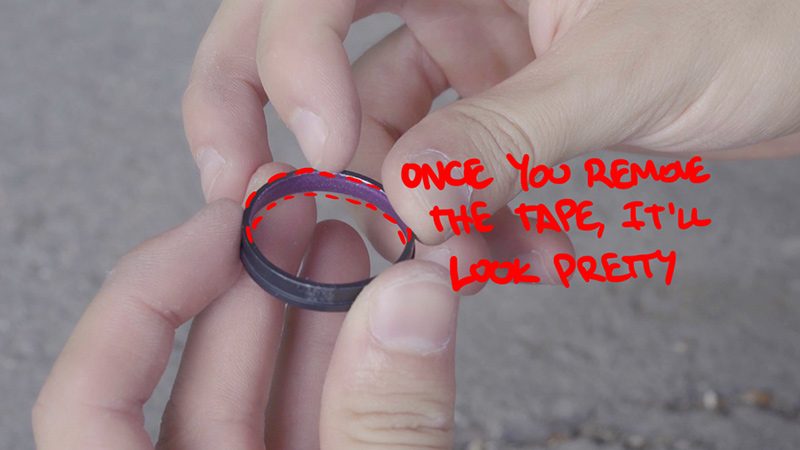
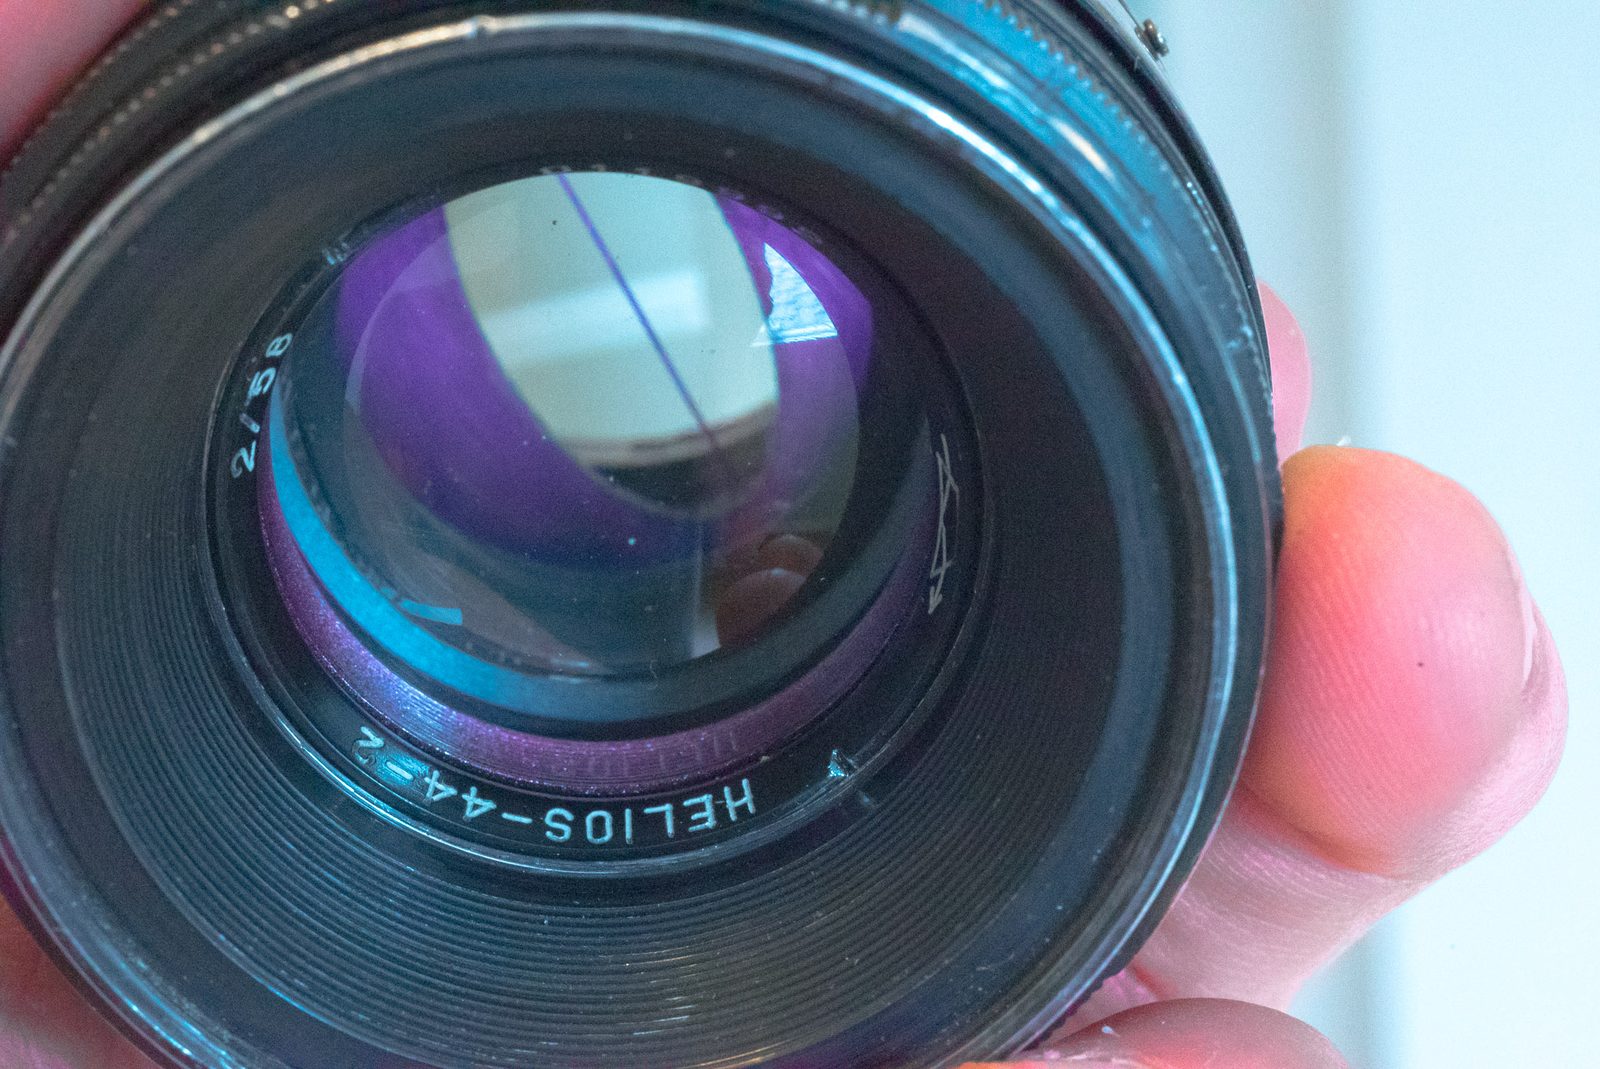
In the mean time I went outside with the rear (now empty) tubing and the front spacer. Wear mask and protective goggles. Using rough sandpaper (100), take out the black paint inside these two pieces. It doesn't have to be perfect. With the masking tape, cut small pieces enough to cover ALL the threads and just leave the sanded metal exposed. Be very thorough and add many layers in the process because the paint will mess up the threads if it gets there. Now, spray it with your favorite color. Here I'm making a purple one. Make sure you get a decent amount of paint in there. When it dries off you can remove all the masking tape. The glass should be dry by now, so it's time to start putting it back together. The painted elements will reflect on the light that bounces inside of the lens, adding a bit of a color tinge to the flares and glow.

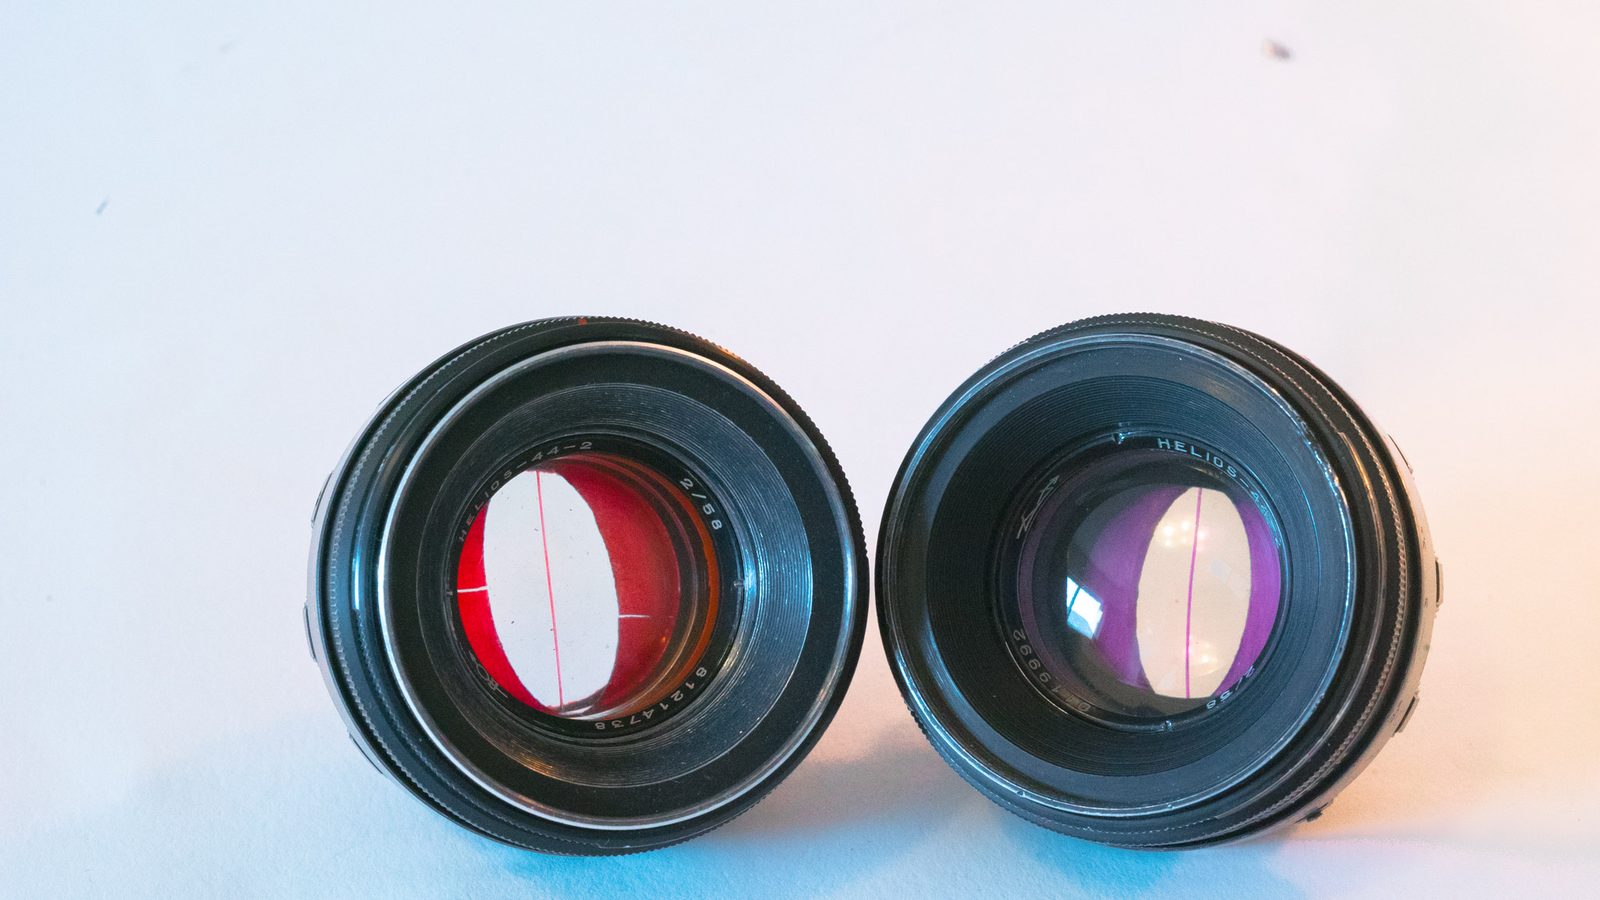
Starting with the front, put back the inner glass element, then the painted spacer, front element and screw it tightly back. Reassemble the back in the same way, but don't fit it in yet. Time to do the oval iris. I had the acrylic disks from the previous tutorial, so I just grabbed one of those. You can choose your aperture value, I'm going with f/2.8 here. Sand it down as thin as you can and be careful not to break it. With the sharpie, paint the disk. I'm going for a crazy look, so I'm gonna use the same color I used for the inside of the lens - purple. This is VERY intense, if you just want oval shapes, paint it black. The tinted aperture has a very strong effect whenever you have a direct light source in the frame, or light rays going straight inside the lens.

UPDATE - OCTOBER 2016: I'm selling aperture discs for this mod on a small scale on eBay, so if you're looking to get some for a decent price, check out the listing!


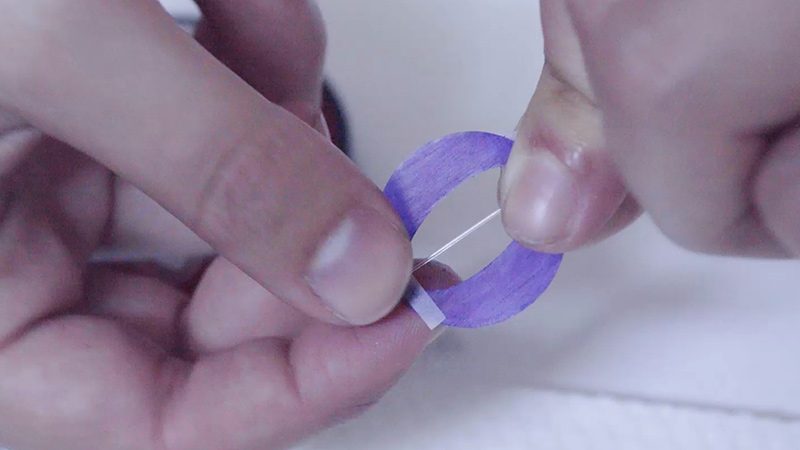
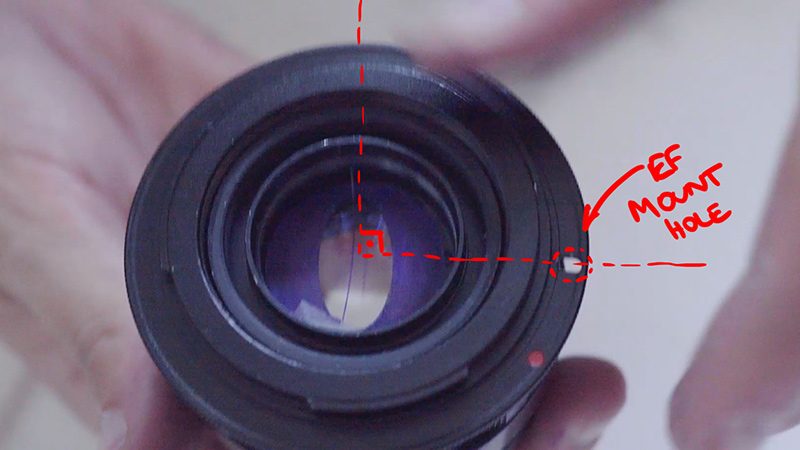
The last step is to attach the fishing line as a flare filter. Put it across the middle and using thin transparent tape, lock it into place. Cut the edges. To make this an unquestionably purple lens, I'm gonna paint it as well. Careful because neither the wire nor the aperture will ever fully dry. Putting the oval with the right orientation can be challenging. I noticed the gap in the EF adapter is always perpendicular to the top of the lens, so I used the as a guide. The easiest way to rotate it in place is using the lens wrench. It still takes a few attempts and sometimes screwing the back element rotates the iris, so take that into account. Screw the back in as tight as you can and be careful not to break the acrylic disk (you'll feel some resistance). The amber one got a few cracks in this process.

That's it! You're done! Now's the perfect moment to subscribe to the channel and check the blog for plenty of other tutorials and reviews. Ferradans out.

UPDATE: If you like this look but not exactly this build, there's a much more guaranteed way to get a buffed up Helios with LOTS of customization from people who actually know what they're doing: the FlareFactory58 and the TRUMPs, made by Richard Gale at DogSchidtOptiks. I reviewed them a few months back and I still dream about it. There you even have the option of getting optical attachments so your custom Helios turns into a full set of 38, 58 and 88mm.